|
|
|
|
|
|
|
Latest Release of NewViews
For optimal performance, make sure you are running the most current version:
NV 2.32.2 (Mar 8, 2018)
|
|
Follow Us on Social Media
Follow NewViews on Facebook and subscribe to our channel on YouTube to get the latest news and videos:


|
|
|
|
|
|
|
|
|
Don't want to receive these emails anymore? Unsubscribe.
|
|
|
April 2018
|
|
NewViews Feature Showcase - EFT

We're excited to launch our first NewViews Feature Showcase! Throughout April, we’ll be showcasing NewViews and EFT
(electronic funds transfer) to pay suppliers and accept deposits from customers. EFT is a time-saving and convenient
option that helps you manage your cash flow and reduces costs associated with producing and processing paper cheques.
Make sure you are running an up-to-date version of NewViews to take advantage of this great feature.
We've posted a short video that demonstrates how to pay suppliers using EFT - to watch it,
click here.
In part 2, we'll show you how to accept deposits from customers.
We’ll also be posting FAQs for NewViews and EFT, and hosting a live online “Ask the NewViews Expert’ session on
April 25 at 1 pm EST. To register for the online event and have your EFT questions answered live,
click here.
|
|
Year-end Reporting with NewViews

If your fiscal is coming up, your accountant will be asking for year-end reports. Did you know you can create a single Excel workbook
that contains multiple reports from NewViews? If Excel is not running when a report is printed to "display", Excel is launched
and a new sheet in a new workbook is created. If Excel is already running when a report is printed to "display",
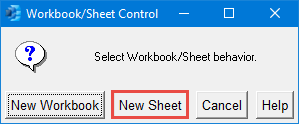
NewViews will synchronize with Excel and the prompt shown below will appear.

The New Sheet option will create a new, named sheet in the active Excel workbook. To append sheets to existing workbooks,
switch to Excel, activate the target workbook, switch back to NewViews, issue the print command and select New Sheet.
You will end up with one Excel file that contains all the reports you need to to send to your accountant.
Which Reports, Views and Dates?
NewViews can print several types of reports; the most basic ones are the:
- Trial Balance
- Balance Sheet
- Income Statement (P&L)
You should also include:
- Historic Aged AR
- Historic Aged AP
- Bank Reconcile - Open Items
- Full detail of all Trial Balance (GL) accounts
If you don't have a Trial Balance report in your books, we can assist you with setting it up.
A traditional Trial Balance includes all the posting accounts on the Balance Sheet and Income Statement.
Trial Balance reports vary in length depending on the number of summary accounts.
Three views are typically used to print the Year-end reports. It is best to report the current year being reviewed and the prior year.
The prior year will show that the prior year's adjusting entries have been posted.
Read the full article, with complete instructions
|

Today's Date Shortcut
A quick and easy way to insert today's date into any date field in a set of books is to type the letter t, then press Enter.
Setting a Default Month and Year in the Date Field
For most date entries, you only need to type 1 or 2 characters for the full date. F12 sets the default date in a date field.
When starting entries for a new month, type the full date (e.g. 01042017) then press F12. This will store April 1, 2017 as the default date.
When a new transaction is added to the same table, the default date will appear automatically. To enter a different day in the same month,
simply type the day's number in the date field and press Enter.
As each journal type has its own defaults, you will need to set the default date for each.
Setting, Getting and Clearing Defaults
As described above, defaults can be set for dates, and they can also be set for descriptions.
For example, in the Bank Deposit journal, most transactions are "Deposits".
If you place the cursor on a description field that has "Deposit" and press F12, the next time you enter a new
transaction in the Bank Deposit journal, the description will automatically be set to "Deposit".
- [F12] - Sets the column default
This performs the same function as the Edit>Default Value>Set command. It sets the column default to the value of the
current cell. When a new row is added to the table its value in the current column will be set automatically to the
default value.
- [Shift+F12] - Gets the column default
This performs the same function as the Edit>Default Value>Get command. It retrieves the current column
default and sets the current cell to that default value.
- [Ctrl+F12] - Clears all defaults
This performs the same function as the Edit>Default Value>Clear All command. It clears all column defaults for
the current table.
|
|


