In the Database Explorer, activate (click on) Suppliers.
Suppliers can be found by expanding the following folders: NewViews/Account/Accounts Payable
Make sure you are on the Single Period Report view.
/ACCOUNT/AP/SUPPLIERS - Accounts, Single Period Report should be displayed in the title bar across the top of the window. If you are not on the Single Period Report view, click the Accounts tab below the title bar to select it.
Activate (click on) the supplier account you want to pay.
To pay more than one supplier, use the Block>Start and Block>End commands to mark the supplier accounts in a block.
Note: If you want to choose which suppliers are to be paid while the Tools>Pay Account command is running, or edit the amounts that are to be paid, activate the first supplier account you want to pay without marking a block.
Issue the command Tools>Pay Account and fill in the prompt as described below.
Note: After the prompt has been filled in for the first time, you normally only have to change lines 1-3 each time you run the Pay Account command.
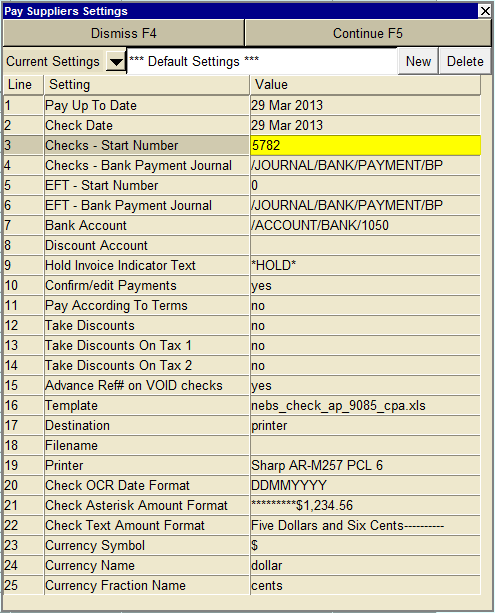
| Line | Field | Values | Comments |
| 1 | Pay Up To Date | Enter the date up to which open invoices are to be paid (press <F3> to select from a calendar). If terms have been entered for suppliers, this date is used for terms calculations. | |
| 2 | Check Date | Enter the date that is to appear on the cheques (press <F3> to select from a calendar). | |
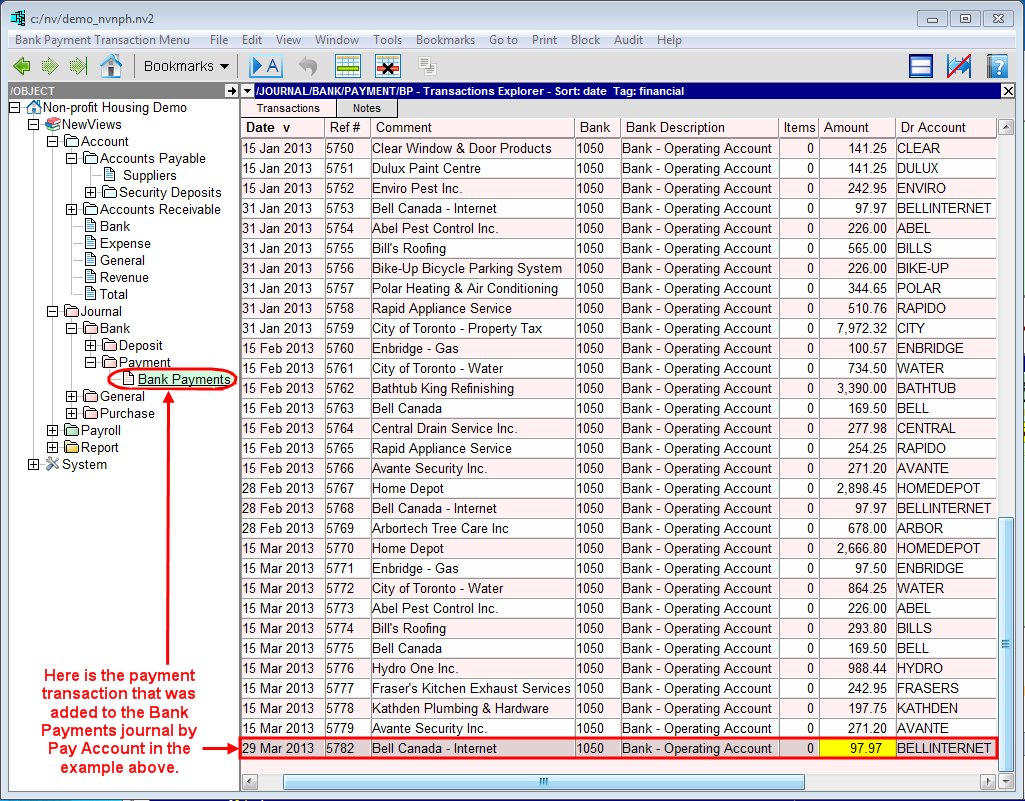
| 3 | Checks - Start Number | Enter the next available cheque number. Cheque numbers are automatically incremented and printed on cheques. They are also entered in the "Ref" field of the corresponding payment transaction. | |
| 4 | Checks - Bank Payment Journal | Enter the name of the bank payments journal to which payment transactions are to be added (press <F3> to select). | |
| 5 | EFT - Start Number | Enter the next available EFT number. EFT numbers are automatically incremented and transmitted. They are usually printed on the bank statements for electronic payments. | |
| 6 | EFT - Bank Payment Journal | Enter the name of the bank payments journal to which EFT payment transactions are to be added (press <F3> to select). | |
| 7 | Bank Account | Enter the name of the bank account to be credited (press <F3> to select). | |
| 8 | Discount Account | Enter the name of the account to be credited if discounts are taken based supplier terms. | |
| 9 | Hold Invoice Indicator Text | When text is entered in this field, the Pay Account command will skip any invoices that contain that text somewhere in the invoice Description field. Text that is used for this purpose should be as unambiguous as possible. For example, instead of using the word "hold", which may be part of a invoice description such as "The Holding Company", you could use "*HOLD*". | |
| 10 | Confirm/edit Payments | Controls confirmation of payment for individual invoices. | |
| yes | Prompts you to confirm each invoice to be paid. Partial payment of individual invoices is also possible with this option. | ||
| no | Pays open invoices without prompting for confirmation. | ||
| 11 | Pay According To Terms | Controls the payment of invoices according to terms entered for suppliers. Note: Many housing providers do not pay invoices based on supplier terms, so this option is generally set to no. | |
| yes | Process payments according to supplier terms. | ||
| no | Ignores supplier terms. | ||
| 12 | Take Discounts | Controls processing of discounts according to terms entered for suppliers. Note: Many housing providers do not pay invoices based on supplier terms, so this option is generally set to no. | |
| yes | Processes any applicable discounts on supplier invoices. The discount account entered in line 8 is credited in the payment transaction. | ||
| no | No discounts are processed. | ||
| 13 | Take Discounts On Tax 1 | Adjusts the discount calculation in line 12 to include/exclude tax 1. Note: This option is generally set to no. | |
| yes | Apply the discount to the net amount of the invoice plus tax 1. | ||
| no | Apply the discount to the net amount of the invoice. | ||
| 14 | Take Discounts On Tax 2 | Adjusts the discount calculation in line 12 to include/exclude tax 2. Note: This option is generally set to no. | |
| yes | Apply the discount to the net amount of the invoice plus tax 2. | ||
| no | Apply the discount to the net amount of the invoice. | ||
| 15 | Advance Ref# on VOID Checks | Void cheques are printed when the number of items being paid exceeds the number of item lines on the cheque stub. Items that do not fit on the first cheque are printed on the next cheque, and the message "This check is NULL & VOID" is printed in the text amount area. | |
| yes | Set to yes if cheque numbers are pre-printed on cheques. This will cause cheque numbers to be incremented automatically to accommodate void cheques. | ||
| no | Set to no if cheque numbers are printed on cheques by the Pay Account command. In this case, the reference number printed on void cheques will be the same as the actual cheques to which they correspond. | ||
| 16 | Template | Enter the name of the cheque template to be used to print the cheque(s) (press <F3> to browse for the template). Templates are usually located in c:/nv/print_templates assuming c:/nv is the NewViews installation folder. | |
| 17 | Destination | Used to control the destination of the output (i.e. the cheques). | |
| display | Sends the output to Excel and opens Excel for a preview. | ||
| file | Sends the output to the file specified in Filename field. | ||
| printer | Sends the output to the printer specified in Printer field. | ||
| 18 | Filename | The output file name (if file has been entered in the Destination field). The file type must be {".xls"}, {".xlt"} or {".pdf"}. See note on Output File Names options. | |
| 19 | Printer | If Destination is set to printer, output is sent to the printer specified in this field. If this field is empty, the Windows default printer will be used. Press <F3> to select from a list of available printers. NOTE: To clear the Printer field, press <F3> to select from the list of printers, and click <Cancel>. | |
| 20 | Check OCR Date Format | Controls the format of the date printed on the cheque, i.e. the order in which the day, month and year are printed (press <F3> to select). | |
| 21 | Check Asterisk Amount Format | Controls the format of asterisks printed on the cheque (press <F3> to select). | |
| 22 | Check Text Amount Format | Controls the format of the text amount printed on the cheque (press <F3> to select). | |
| 23 | Currency Symbol | Controls the currency symbol printed on the cheque, generally $. | |
| 24 | Currency Name | Controls the currency name printed on the cheque, generally dollar. | |
| 25 | Currency Fraction Name | Controls the currency fraction printed on the cheque, generally cent. | |
Click the <Continue> button to pay the supplier(s).
If Confirm/edit Payments is set to yes, a table showing the payment that will be made to the supplier is displayed.
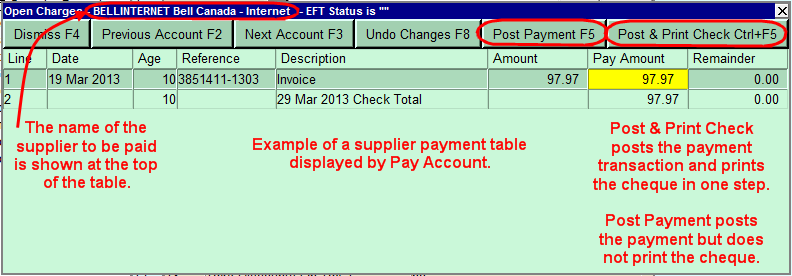
A separate table is displayed for each supplier account, starting with the account that was active when the Pay Account command was issued or, if a block was marked, the first account in the block.
You can use the <Previous Account> or <Next Account> buttons to skip the payment for the supplier that is currently displayed.
If necessary, you can edit the Pay Amount for each of the invoices to be paid. For example, if a supplier has two open invoices and you want to pay one of them now and the other one at a later date, change the pay amount of the invoice you don't want to pay to 0. This is necessary if you have a Miscellaneous Supplier account with more than one invoice from different suppliers. See Paying Miscellaneous Vendors for details.
If you make changes and then decide to revert to the original payment as determined by Pay Account, click <Undo Changes>.
To post the payment for the current supplier, click the <Post Payment> button. To post the payment and print the corresponding cheque, click the <Post & Print Check> button.
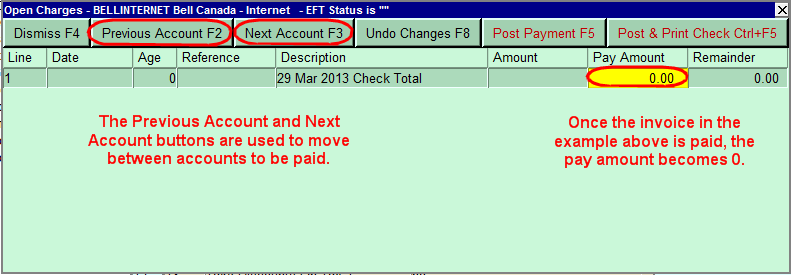
To pay other suppliers, use the <Previous Account> and <Next Account> buttons to move through the supplier accounts.
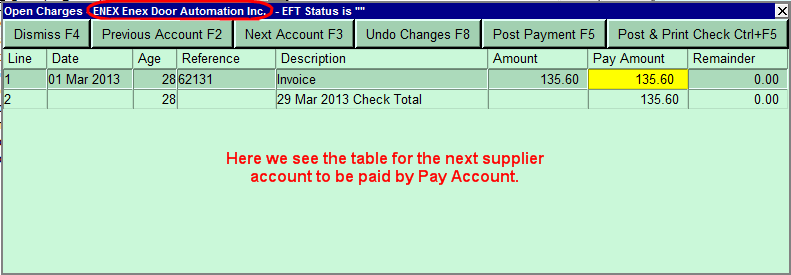
When you are done paying suppliers, click the <Dismiss> button to end the Pay Account command.