Paying Suppliers with EFT
EFT Payments is used to send payments to suppliers electronically (i.e. payments are withdrawn from
your organization's bank account and deposited to suppliers' bank accounts).
In order to do this, NewViews creates an EFT file complying to the CPA-005
format of the Canadian Payments Association.
Before you can use EFT to pay suppliers, the bank account from which you will be making payments must be set up for
EFT. For instructions on doing this, see "Setting up a Canadian Bank for EFT". Suppliers who are being
paid by EFT must also have active EFT status (see Setting Up a Supplier for EFT for details).
To use EFT, you generate supplier cheques as usual with the Tools>Pay Account command.
Instead of printing the cheques, however, you create an EFT file. The EFT file is then transmitted to your bank for processing.
After you generate and transmit your EFT file, you should print
the EFT payments detail advisory containing the information on invoices paid.
See "Printing EFT Payments Detail Advisory".
Creating an EFT File
To create an EFT file:
-
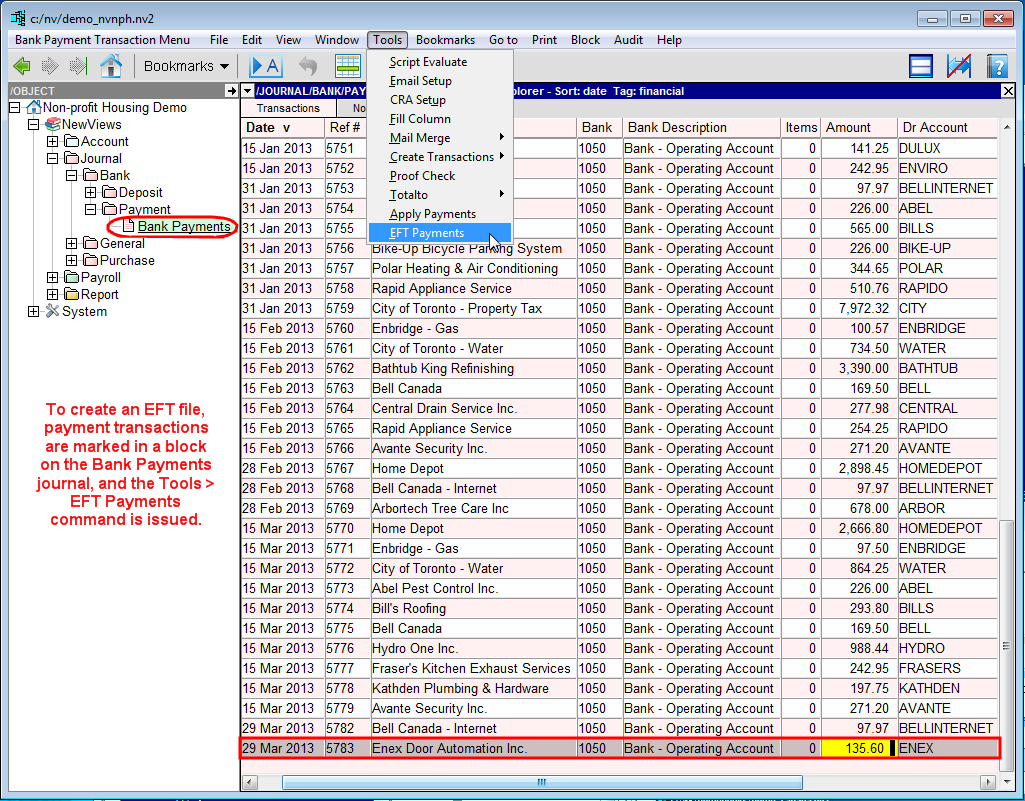
In the Database Explorer, activate (click on) the Bank Payments (BP) journal.
The Bank Payments journal can be found by expanding the following folders: NewViews/Journal/Bank/Payment
-
Make sure you are on the Transaction Explorer view of the journal.
/JOURNAL/BANK/PAYMENT/BP - Transactions Explorer (where BP is the name of the Bank Payments journal)
should be displayed in the title bar across the top of the window. If you are not on the Transactions Explorer
view, click the Transactions tab below the title bar.
-
Mark the transactions to be paid by EFT in a block using the Block>Start and Block>End
commands.
Note: If supplier accounts with non-active EFT status are included in the block, the
Tools>EFT Payments command will report an error for each of these accounts to let you know they
are not being included in the EFT file. This is for your information only and will not affect the EFT file.
-
Issue the Tools>EFT Payments command.
-
The EFT Payments preview window is displayed.
When you issue the Tools>EFT Payments command,
before the EFT file is created, you are given a chance to preview the information.
This preview displays the net amounts that will be paid for each vendor,
as well as totals and counts.
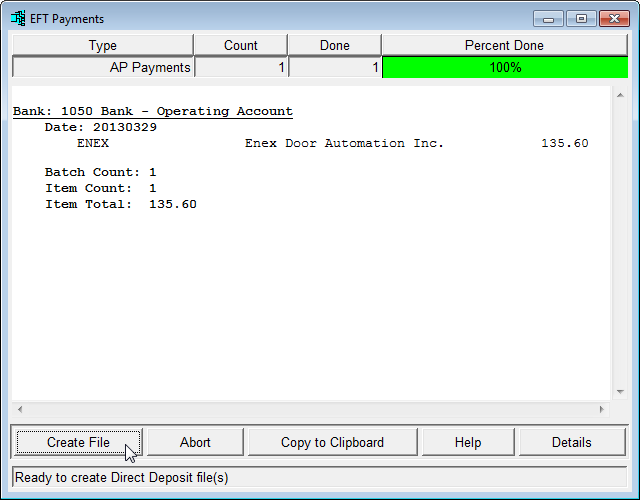
-
If you are satisfied with the preview, click <Create File> to
create the EFT file.
If there are errors in the preview (other than those associated with supplier accounts that do not,
and are not supposed to, have active EFT status, click <Abort>). Fix any issues that
were identified, then run the Tools>EFT payments command again.
-
Once the EFT file is created, it must be transmitted to your bank using the method they have provided.
Detailed EFT Payments Preview
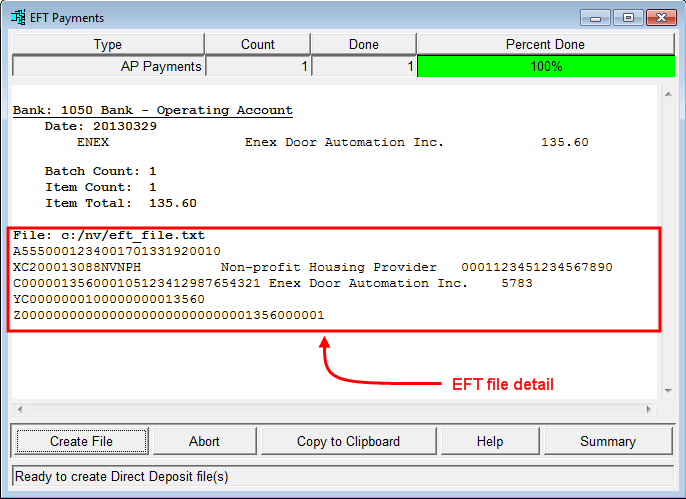
You can display a more detailed preview by clicking the <Details> button.
In addition to summary information, the actual text of the EFT file
is displayed in ASCII format.
Printing EFT Payments Detail Advisory
After you create and transmit your supplier EFT file, you should print
the EFT payments detail advisory containing the information for invoices paid.
See "Printing EFT Payments Detail Advisory".
EFT File Rejection
Your bank will validate the financial institutions, branch numbers,
and bank account numbers for each payment transaction in your EFT file.
If any or all of this information cannot be validated, the file may be rejected and you will be notified,
typically within an hour.
Please note that you are responsible for the EFT banking information that you enter in NewViews.
Such problems are addressed by correcting the information for one or more suppliers,
then creating and transmitting a new EFT file with the corrected information.
Copyright (c) 2003-2026 Q.W.Page Associates Inc., All Rights Reserved.