NewViews lets you hook up accounts in a totaling structure to accommodate a wide range of accounting entities. Previous sections of this manual show various ways you can display this totaling structure in graphic form.
However, it is also possible that errors or omissions can occur when hooking the accounts up and this section shows how you can detect and correct some of these potential problems.
The concept of a proof account is introduced and we show how they are used to detect errors in the totaling structure. Checking the proof accounts can be done manually but they can also be checked automatically by certain trigger events such as opening and closing a set of books (i.e. by login and logout).
When problems are detected, we go on to show how they can be investigated using several tools designed for that purpose, such as the orphan search and the transaction proof check.
A proof account is an account that you expect to have a zero balance. For example, all accounts on the trial balance report total to a proof account at the bottom of the report. In this manual we refer to this proof account as TB-PROOF, but in your set of books it could have any name you decide to give it. TB-PROOF's balance should always be zero. Also note that TB-PROOF will most likely not total to any other accounts. These are typical characteristics of a proof account: it has a zero balance and it doesn't total anywhere. This makes the proof account a root (also called a sink) in the totaling structure.
There is no explicit proof account type in NewViews. It is the way an account has been set up in the totaling structure that makes it a proof account. Also note that the criterion that a proof account doesn't total anywhere is not mandatory, but if a proof account does total elsewhere, it will most likely be to another proof account.
Another common example of a proof account would be BS-PROOF. Accounts on the trial balance total to accounts on financial reports such as the income statement and balance sheet. Traditionally, amounts on the balance sheet eventually total to one of two accounts: BS-ASSETS (Total Assets) and BS-L&E (Total Liabilities and Equity). When these two accounts have equal (but opposite i.e. debit versus credit) amounts, the books are said to balance. If you total these accounts to a proof account, say BS-PROOF, then BS-PROOF serves as a proof account and it will always have a zero balance when the balance sheet balances.
The TB-PROOF and BS-PROOF accounts mentioned above are typical but there are no limitations in NewViews and you can have additional proof accounts as warranted. For example, if you manage multiple accounting entities in the same set of books then each entity will likely have separate proof accounts.
If you have set up proof accounts such as TB-PROOF and BS-PROOF as described in the previous section, then their balances should always be zero. If the balance of a proof account is non-zero then we can conclude that the books are out of balance. For example, if BS-PROOF is non-zero then total assets will likely not equal total liabilities.
So how can this happen? Well the first thing to remember is that the books are never really out of balance. Total debits always equal total credits and in this sense the books always balance. They only appear to be out of balance, and that is almost always due to omitting to hook an account into the totaling structure.
If you have proof accounts then the most basic way to ensure your books balance is to examine the proof accounts. If all proof accounts have a zero balance then your books are balanced. Otherwise you will have to find the problem in the totaling structure and fix it.
There are two basic types of proof check operations.
Proof Checking Account History
When you proof check account histories, you are checking to ensure that the balances of a set of proof accounts are zero. This operation is much faster than the transaction proof check described below, so it is used for automatic proof-checking operations such as every time a user logs into or out of a set of books. The account history proof check is a quick way to detect that the existence of a problem but it doesn't tell you much about the cause of the problem.
All account history proof checks are controlled by the proof control view. On a proof control view row you enter the set of proof accounts you want to check, and optionally, which events should trigger the check automatically, if any. You also select the amount tags (one or more of financial, order, etc), that you want checked. Optionally, you can narrow the check down by specifying begin and end dates but account history proof checking is so fast that this is seldom necessary. However, the date range is still useful when using proof check control rows to control a transaction proof check, which is a slower operation.
Proof Checking Transactions
A transaction proof check is used to check whether a set of transactions is causing the books to go out of balance. It takes longer than an account history proof check, depending of course on how many transactions you want to check. However, a transaction proof check has an advantage over an account history proof check because it provides information that helps you find the cause of the problem. Typically you only run a transaction proof check after an automatic account history proof check detected a problem.
Starting with version 2.21, NewViews provides a document that controls the manual or automatic checking of proof account balances. An example of the view is shown below.
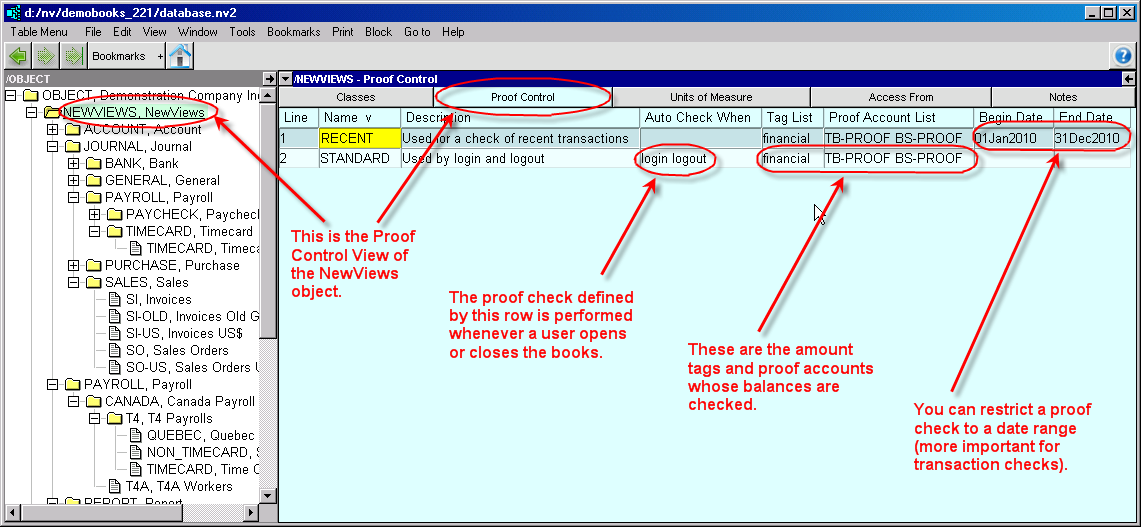
Let's examine the first row, the one with name STANDARD and description Used by login and logout.
Name and Description
Just set the name and description to help you identify the purpose or use of the proof check row. Here we called it STANDARD because it checks TB-PROOF and BS-PROOF which is consistent with the basic proofs described in this section.
Auto Check When
This field controls automatic proof checking on the occurrence of a list of one or more events. Here the field has been set to login logout. At this time these are the only available events but this may change. When a user opens or closes this set of books, the proof check as defined by the STANDARD row will be performed. Automatic proof checking can be turned on/off for each user in the user's options described later in this section.
This field can be empty if you simply want to use the row to control a manual proof check by setting its tag list, proof account list, and optionally a date range. Then it will not triggered be any events, but only when you issue the Tools>Proof Check>Account History or Tools>Proof Check>Transactions commands.
Tag List
The proof check is performed only on the tags specified here. Usually you will pick financial. If the tag list is empty then no proof check is performed.
You can press <F3> to select from the available tags. You can press <F3> each time you want to add another tag. You can also edit the field directly.
Proof Account List
The proof check is performed only on the proof accounts specified here. If the proof account list is empty then no proof check is performed.
You can press <F3> to select an account. You can press <F3> each time you want to add another account. You can also edit the field directly.
Begin Date and End Date
If these dates are left empty then balances are checked for the entire range used in the set of books. However, you can restrict the check to any date range as specified by these fields. This is especially useful for a transaction proof check where you only want to check transactions in a recent date range, for example.
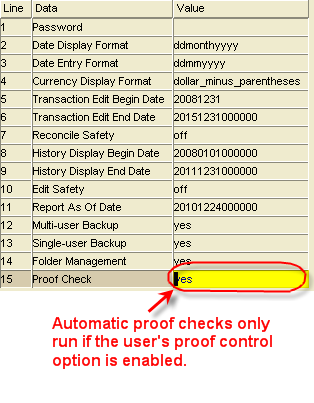
Each user has a proof check option. To enable automatic proof checks for a user you must turn the user's proof check option on. Assuming the user's proof check option is on, the STANDARD row in the proof control view figure will perform a proof check each time this user opens or closes this set of books. If the balances of the TB-PROOF and BS-PROOF accounts are zero, then the books are simply opened/closed as usual. However, if either proof account has a non-zero balance then the user will be notified in a dialog as shown later in this section. The dialog lets you produce an exception report or just continue without a report.
Typically you will create an exception report once and then skip the report from that point forward until the issue is resolved and the prompt goes away. In the meantime, the prompt will remind you of the problem each time you open or close the set of books. This is intentionally annoying, but remember that you can also disable automatic proof checking in your user options.
You can run a proof check on any selected set of transactions and proof accounts. But first, what does it mean to run proof check on a set of transactions?
When you run a proof check on a set of transactions, you also select a set of proof accounts, such as TB-PROOF or BS-PROOF or both. Each transaction is checked and an exception is created if the transaction does not pass the proof check. For each proof account, the proof check for a transaction passes if every account it posts to eventually totals to that proof account.
Each transaction posts to a number of accounts. These accounts must all total to each selected proof account, or else none must total to it. It's an all-or-nothing situation. When some of the posted accounts total to a proof account and others do not, the effect on the proof account can be non-zero. That implies that the transaction will put the books out of balance.
Running a proof check on account histories only checks proof accounts, and as a result can only report which proof accounts are non-zero. When a proof check on a transaction produces an exception, we not only know there is a problem, but we have better information to investigate it's cause. The exception report for a transaction proof check clearly shows that the source of the problem is account 6700 in the example shown later in the section. See Running a Transaction Proof Check to Find the Problem
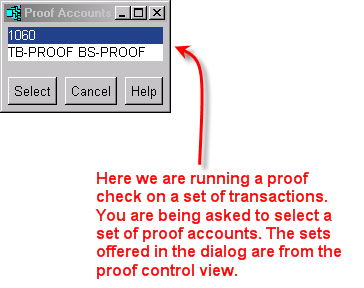
Here is how you specify the set of proof accounts that will be used for a transaction proof check. When you run a transaction proof check, a list dialog pops up with one row for each row on your proof control view, as shown in the figure below. Each proof control row has a field with a list of proof control accounts. By picking from the list dialog you can pick any of the available proof control lists for this particular transaction proof check operation.
The exceptions shown on the exception report were detected when checking the selected transactions. Each exception identifies the transaction, the proof account, and the orphans.
When the all-or-nothing rule is broken, the accounts that do not total to the proof account are referred to as orphans. An account could be an orphan for a number of reasons depending on the their context within a particular set of books, but it usually boils down to omitting to hook the orphan into the totaling structure so that it eventually totals to the proof account. Therefore the problem can be fixed by hooking the orphan's total parent to an appropriate total account.
When an exception is encountered it is often one of a cascade of similar problems that can all be fixed by hooking up the same orphan. For this reason we limit the number of exceptions to 25.
An exception report is stored in a file as shown in the caption line at the top of the exception report window. This file is stored in the same folder as the database on which the operation was run. The file is a standard windows help file (compiled HTML) with the extension .chm. If you close this report window you can bring it back up by double-clicking on the .chm file from a Windows file explorer or equivalent program. You can delete the file at any time (if it not currently open) to get rid of it when no longer needed.
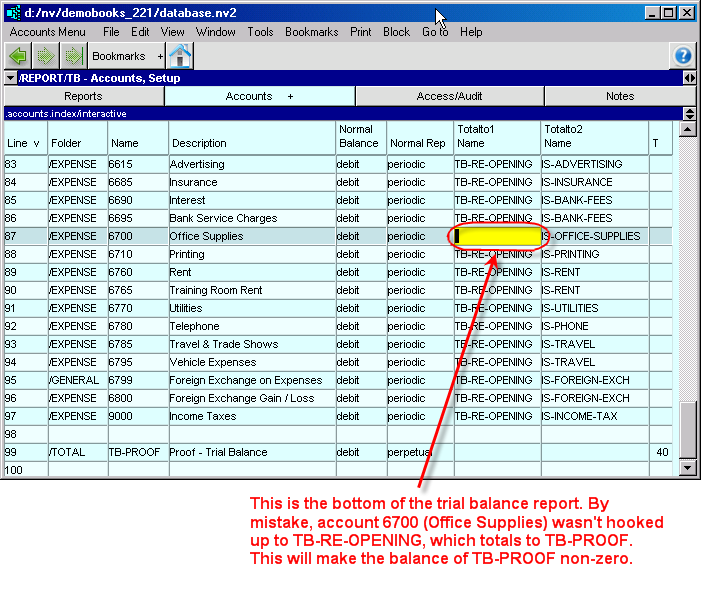
Let's suppose an account on the trial balance was not hooked into the totaling structure. Forgetting to hook up a total-to is the most common cause of the books appearing to go out of balance. Shown below is the bottom section of the trial balance report. Notice that all of the accounts total to TB-RE_OPENING which, although not seen in the figure, in turn totals to TB-PROOF. However someone forgot to total account 6700, Office Supplies, to TB-RE-OPENING. If account 6700 has a non-zero balance, then TB-PROOF will also be non-zero.
Without using the proof control view, you would have to somehow notice that the TB-PROOF account balance is non-zero in order to detect that something is wrong. However, because a proof check is being performed by each login and logout, a prompt such as that shown below will appear whenever you open or close this set of books.
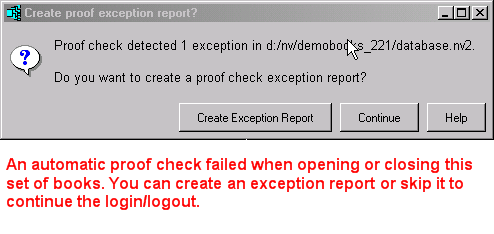
From now on you will be faced with this prompt each time you login (open) or logout (close) of the books. What you should do, at least once, is create an exception report to start the process of fixing the problem. In this case the report shown below will be created.
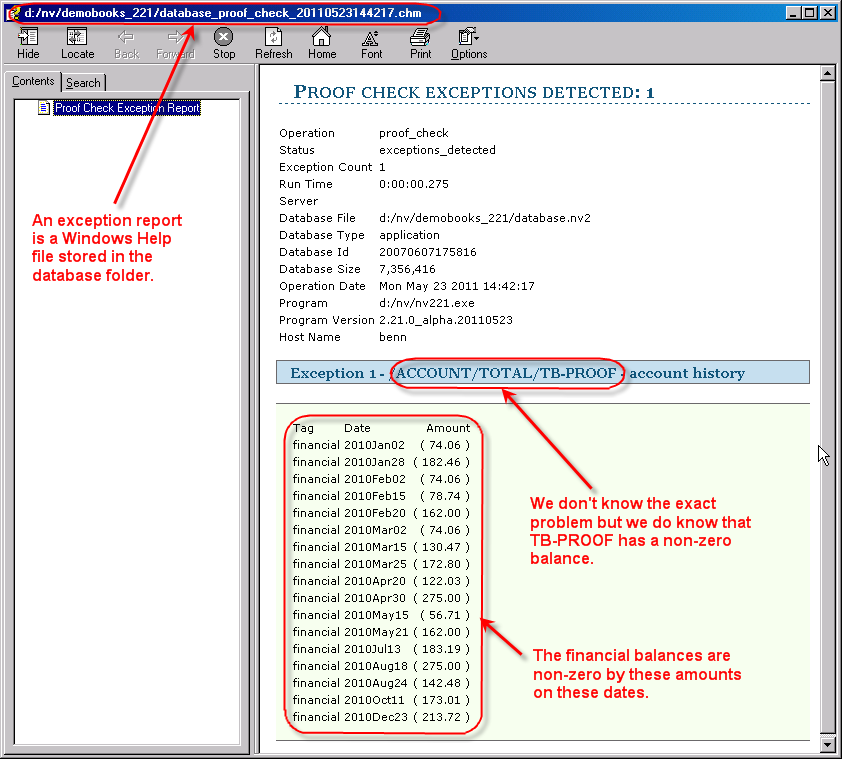
The exception report lists each proof account that has a non-zero balance. The proof check that generated this report checked TB-PROOF and BS-PROOF as defined by the row on the proof check control view. If BS-PROOF had been out of balance (non-zero) it would also have been be listed in the report. But account 6700 still totals to its corresponding account on the balance sheet so BS-PROOF is still zero.
At this point we really know very little except that there is a problem with TB-PROOF. There are two ways we can proceed, and both will provide additional information leading to the solution of the problem. One is an orphan search and the other is a transaction proof check.
First, we will perform an orphan search on the TB-PROOF account. We position on the TB-PROOF account on the trial balance report and issue the Tools>Totalto>Orphan Search command. After going through a few confirm dialogs the report shown below is presented.

The orphan search command, when run on the TB-PROOF account, lists all posting accounts that do not eventually total to TB-PROOF. At this point you should visit the office supplies account which, as indicated by the orphan search report, is on the trial balance report. When on the trial balance, looking at account 6700, it should then be obvious that like all the other accounts around it, 6700 should also total to TB-RE-OPENING. Total it to TB-RE-OPENING now. From this point forward the proof check prompt should no longer appear during login and logout. But you can verify this manually by positioning on the STANDARD row on the proof control view, i.e. the one used for login and logout, and issuing the Tools>Proof Check>Account History command. It should complete and pop up a dialog reporting success.
The Tools>Proof Check command can be run on the proof control view to manually check account histories or transactions. We could position on the STANDARD row of the proof control view and issue the Tools>Proof Check>Transactions command. But be careful. Doing so would process every transaction in the set of books and that could be time consuming indeed. You can restrict the transactions to a date range by filling in the Begin Date and End Date fields. Or you can position on the transactions of any journal (pink) or account ledger (green), mark a block, and issue the Tools>Proof Check command.
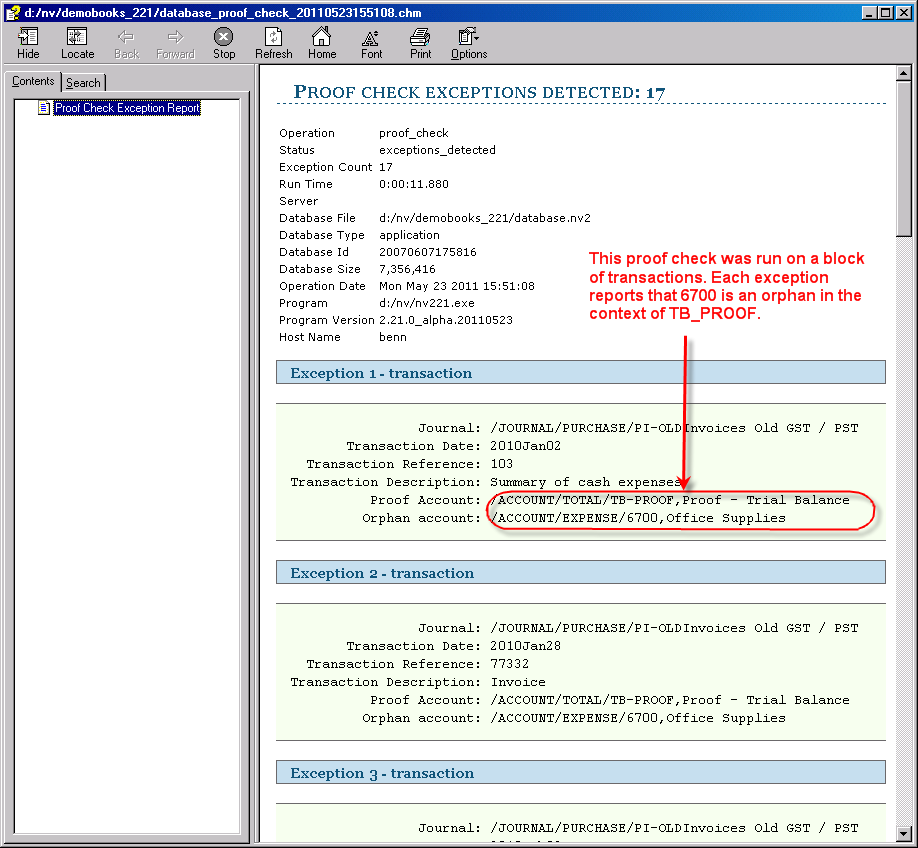
The report generated by transaction proof check will list each transaction for which a problem was detected. These problems tend to repeat for each transaction and shown above each of the 17 exceptions identifies 6700 as the problem account in the context of TB-PROOF. However, clearly, we have another tool in addition to Orphan Search which can help identify problems associated with the total structure of the set of books.