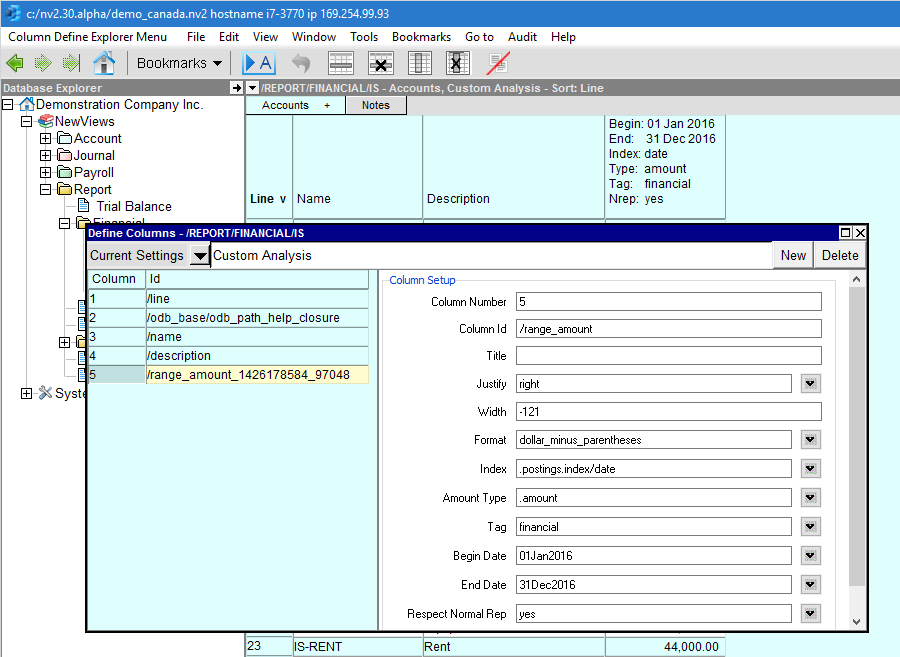
Range Fields - Account Balances
Account ranges typically display sums of postings from account ledgers.
They are found on most tables of accounts.
The example shown below is an Income Statement Custom Analysis, with a single range
column (you can easily add, change and delete columns - see
Setting Up A Custom Analysis).

Range fields for accounts provide six extra options used to control the number
displayed (row 7 to 12).
They are listed and described in detail below.
NOTE: In NV1 you are able to set report dates and the amount types by
entering them directly in the report header.
In NV2, there are more options, and fitting them all in a column title for direct
entry is not practical.
Setup Columns
|
Line
| Field
| Options
| Value
|
7
| Index
| 
| The index field is used to specify the type of transaction that is used to generate analysis amounts or quantities. Press <F3> and the box on the left appears, click with the mouse to select the index.
|
.index/date
.index/date/debit
.index/date/credit
.index/date/closed
.index/date/open
| date - selects all transactions sorted by date.
debit - selects only debit transactions sorted by date.
credit - selects only credit transactions sorted by date.
closed - selects only closed (reconciled) transactions sorted by date.
open - selects only open (unreconciled) transactions sorted by date.
|
8
| Amount Type
| 
| Determines what type of amount is displayed. Press <F3> and the box on the left appears, click with the mouse to select the amount type.
|
.count
.amount
.quantity
| count - displays a count of the items (e.g. the number of transactions).
amount - displays the currency amount.
quantity - displays the quantity, unit of measure insensitive.
|
9
| Tag
| 
| The Tag can be selected by pressing <F3>. The Tag field is used to select specific types of transactions (e.g. financial, order, budget, etc.).
|
10
| Begin Date
| The range Begin Date can be selected from a calendar by pressing <F3>. The interpretation of Begin Date splits into two worlds, depending on the value of the Respect Normal Rep field (see below).
|
11
| End Date
| The range End Date can be selected from a calendar by pressing <F3>.
|
12
| Respect Normal Rep
| You have the option of respecting or ignoring an account's normal representation. If you set the Respect Normal Rep option to no, the amount displayed is the sum of postings dated within the period specified for the range, regardless of the account's normal representation. NOTE: This is exactly how NV1 behaves.
|
Respect Normal Representation - Line 12 above
If you set the Respect Normal Rep option to yes,
the amount displayed depends on the account's normal representation:
Perpetual: an empty begin date is used to determine the amount (no matter what the begin date is set to).
Periodic: whatever the begin date is set to is used to determine the amount.
Opening: whatever the begin date is set to, minus one second, is used to determine the amount.
Respect Normal Rep was added to NV2 to solve a long-standing problem.
NV1 (and NV2) are based on a perpetual accounting model (income and expense
(periodic) accounts are not closed every accounting period).
However, many accountants and experienced bookkeepers resisted the change because it was difficult
to display, in one column, an account's opening balance, change in the period and closing balance.
A classic example of the use of Respect Normal Balance is Opening Retained Earnings,
Change to Retained Earnings and Closing Retained Earnings. For a traditional Balance Sheet presentation
of earnings, total the bottom line of the Income Statement (or the bottom line of the Statement of Retained
Earnings, or all periodic accounts on a Trial Balance) to Opening Retained Earnings on the Balance Sheet.
Next total Opening Retained Earnings to Change to Retained Earnings, and total Change to
Retained Earnings to Closing Retained Earnings.
Set the normal representation of the Opening account to opening,
the Change account to periodic and the Closing account to
perpetual.
Finally, set the column begin and end dates to cover the period you want for the Change account.
Copyright (c) 2003-2022 Q.W.Page Associates Inc., All Rights Reserved.


