This page provides the steps for granting user access rights. For a more general introduction to the NewViews security model see Setting Up Security.
We assume that you are the administrator and you want to grant or change a user's access rights. If you are not the administrator you likely don't have the access rights required to follow the steps as outlined below. Typically, only the administrator, or a user who has been granted access to the root user object can follow the steps below.
To grant access rights:
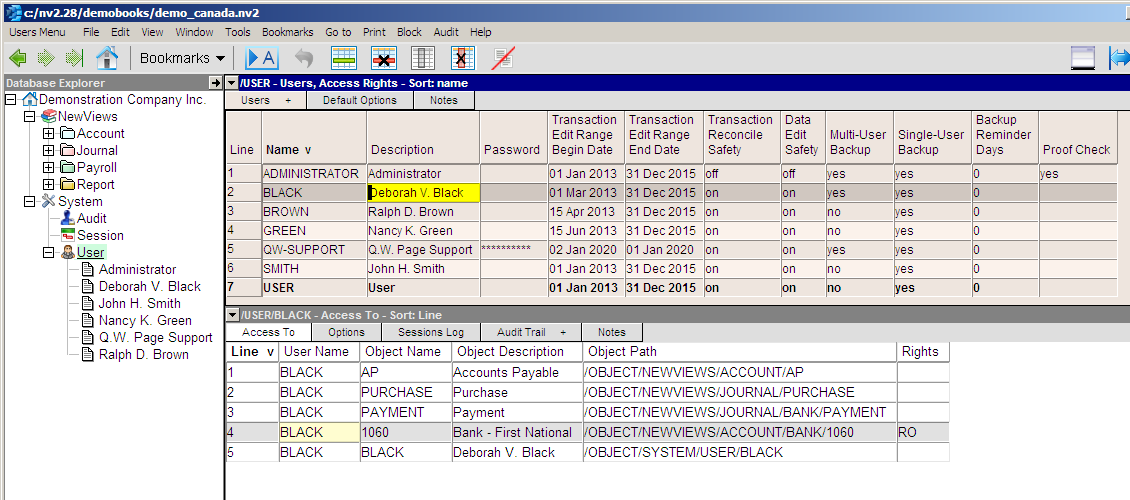
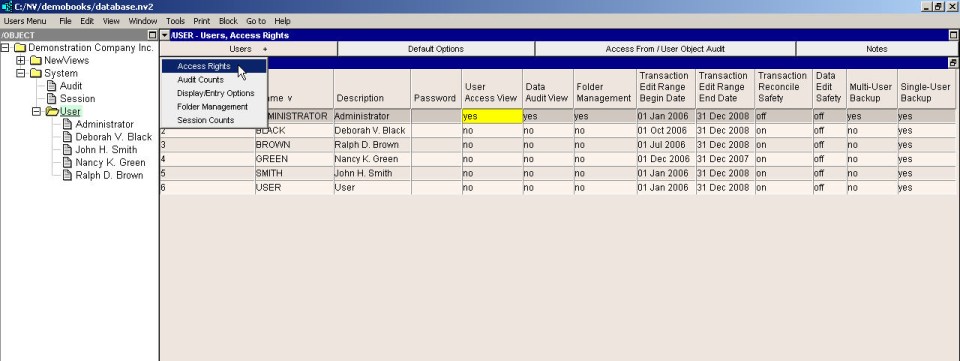
Click on System/User in the main tree explorer in the left pane.
See the figure above. The selected folder in the tree explorer in the left pane is the root user. NOTE:, you don't have to expand the root user to display the users as shown in the figure. You can just select it.
Select Users Explorer from the window list in the right pane.
When you clicked on the root user object, the right pane might already be on the Users Explorer view as shown in the figure above. If that is the case you don't need to change the view. Otherwise, click on the button in the top-left corner of the right pane and a window list pops up displaying the available views. Select Users Explorer from the window list.
Click on the row for the user to which you are granting access
Or add a new user at this point. We are assuming here that the user already exists but if not, add the user now. See Adding a New User.
In the bottom pane, switch to the Access Tos view.
Click on the window tab Access Tos or window list button in the upper-left corner of the bottom pane and select Access Tos from the window list. Each row in the access tos table grants access to a single database object.
Add a row to the table of access objects in the bottom pane.
Click somewhere in the bottom pane to make sure it is the active window. Then press the <Insert> key to add a row. There are also other ways to add a row. For example, you can issue the Edit>Insert or Edit>Append command, or press their keyboard equivalents, <Alt+E+I> and <Alt+E+A>.
Position on the Object Name or Object Description and press <F3>.
When you press <F3> a selection window pops up. The window contains a tree very similar to the main explorer tree.
Pick the object to which you are granting the user access.
You can expand nodes in the tree as necessary. The goal here is to pick the object to which you are granting the user access. <Double-Click> on the desired tree folder to select it. The selected object name and description will then appear in the access row. Note that when you select an object you are granting access not only to the objects itself, but also to all objects below that object in the object hierarchy.
Set the read only option in the Rights field. This is an optional setting to grant a user access but not the ability to change the object.
Note that an empty value in the Rights field is the default setting indicating the ability to make changes.
The steps above can be repeated to add any required number of access rows to a user object.
| User Access Rights | ||
| Table column | Sort | Comments |
| Line | Yes | The line number. |
| Name | Yes | The name of the user. |
| Description | Yes | The description of the user. |
| Password | | The password of the user. |
| User Access View | | Allows a user to view access information. |
| Data Audit View | | Allows a user to view audit information. |
| Folder Management | | Allows a user to manipulate the folder and sub-folder structure. |
| Transaction Edit Range Begin Date | | Specifies a date range in which transaction work is allowed. If you don't want the user to perform any transaction work prior to a specific date, for example because the books were closed on that date, then set that date in the transaction edit begin date. Transactions dated before the edit begin date cannot be changed or deleted, and you cannot add new transactions dated prior to the begin date. If you leave the edit begin date empty then the user can affect the books back in time without restriction. |
| Transaction Edit Range End Date | | Specifies a date range in which transaction work is allowed. Transactions dated after the transaction edit end date cannot be changed or deleted, and you cannot add new transactions dated after the end date. This prohibits the user from entering dates too far into future, which would usually be caused by simple data entry error. If you leave the end date empty then the user can affect the books forward in time without restriction. |
| Transaction Reconcile Safety | | Allows a user to edit reconciled transactions. This field is defaulted to on for a new user because in general, reconciled transactions should not be modified without due care and attention. Note that reconciled fields can still be unreconciled if this field is set to on. |
| Data Edit Safety | | When set to on, any attempt to edit data will cause a confirmation prompt to appear. Once the data object being edited is "dirty" no further prompts occur. |
| Database File Download | | Allows a user to issue the File>Download command to download a remote database. |
| Database File Backup | | Allows a user to issue the File>Backup command to back up a local database. |