Click NewViews/Account/Accounts Payable in the NV2 Database Explorer.
Activate the vendor account you want to pay. If you want to pay more than one vendor, use the Block>Start and Block>End commands to mark the accounts to be paid in a block. If you want to choose which vendors are to be paid while the Tools>Pay Account command is running, or edit the amounts that are to be paid, activate any vendor account in the table.
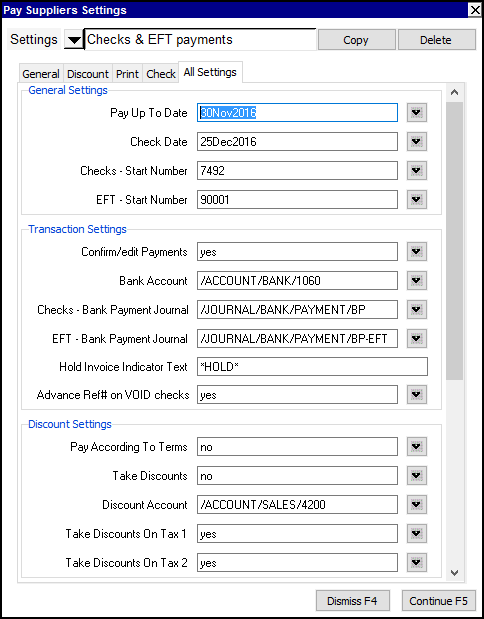
Issue the command Tools>Pay Account and fill in the prompt as follows:

Use the User Option, Prompt Display Style to switch between modern and classic styles.
| Line | Field | Values | Comments |
| 1 | Pay Up To Date | Enter the date on which invoices are to be paid, (press <F3> to select). This date is the effective date for terms calculations. For example, if terms for a supplier are "Discount days" of 10, "Discount rate" of 2, and "Net payable days" of 30, invoices less than 10 days old are paid after optionally taking a 2% discount, and all invoices over 30 days are paid as well. Invoices between 11 and 30 days are not paid. | |
| 2 | Check Date | Enter the date that is to appear on the checks, (press <F3> to select). | |
| 3 | Checks - Start Number | Enter the next available check number. Check numbers, which are automatically incremented, are printed on the checks and appear in the "Ref" fields of the transactions representing the checks. | |
| 4 | Checks - Bank Payment Journal | Enter the name of the bank payments journal to be used to journalize the paper check transactions (press <F3> to select). | |
| 5 | EFT - Start Number | Enter the next available EFT number. EFT numbers, which are automatically incremented, are transmitted and are usually printed on the bank statements for electronic payments. | |
| 6 | EFT - Bank Payment Journal | Enter the name of the bank payments journal to be used to journalize the EFT Payment transactions (press <F3> to select). | |
| 7 | Bank Account | Enter the name of the bank account to be credited (press <F3> to select). | |
| 8 | Discount Account | Enter the name of the account to be credited if discounts are taken. | |
| 9 | Hold Invoice Indicator Text | The Pay Account script will skip payment of any invoices that contain the text entered in this field somewhere in their description/comment. The hold text, both in the "Hold invoice text" field and in the invoice "Description" or "Comment" fields, should be as unambiguous as possible. For example, instead of using the word "Hold", which may be part of a regular description such as "THE HOLDING COMPANY", you could use "*HOLD*" | |
| 10 | Confirm/edit Payments | Controls confirmation of payment for individual invoices. | |
| yes | Prompt for confirmation of each invoice to be paid. Partial payment of individual invoices is also possible with this option. | ||
| no | Skips the confirmation of individual invoices. | ||
| 11 | Pay According To Terms | Controls the payment of invoices according to the terms entered on the vendor's Trade/Tax info. | |
| yes | Process payments according to vendor's terms. | ||
| no | Ignore vendor terms. | ||
| 12 | Take Discounts | Controls discounts according to the terms entered on the vendor's Trade/Tax info. | |
| yes | Take discounts on vendor invoices that meet the vendor's terms. Adds a credit to the discount account entered on line 6 above. | ||
| no | Do not take discounts. | ||
| 13 | Take Discounts On Tax 1 | Controls the discount calculation in line 10 above, Take Discounts. In some jurisdictions the early-payment discount may not change the amount on which Tax 1 is calculated. | |
| yes | Apply the discount to the net of the invoice plus tax 1. | ||
| no | Apply the discount to the net of the invoice. | ||
| 14 | Take Discounts On Tax 2 | Controls the discount calculation in line 10 above, Take Discounts. In some jurisdictions the early-payment discount may not change the amount on which Tax 2 is calculated. | |
| yes | Apply the discount to the net of the invoice plus tax 2. | ||
| no | Apply the discount to the net of the invoice. | ||
| 15 | Advance Ref# on VOID Checks | Void checks are printed when the number of items being paid exceeds the number of item lines on the check stub. Items that do not fit on the first check are printed on the next check, and the message "This check is NULL & VOID" is printed in the text amount area. | |
| yes | Set to yes if the checks you are printing are pre-numbered. This will cause check numbers to be incremented for void checks. | ||
| no | Set to no and the reference number of the void checks will be the same as the actual checks to which they correspond. | ||
| 16 | Template | Enter the path to the check template that is to be used to print the check(s) (press <F3> to choose the template from an explorer). Preset templates for use with NV2 are located in c:/nv/print_templates/checks assuming c:/nv is the NewViews installation folder. | |
| 17 | Destination | Used to control the destination of the output. | |
| display | exports to Excel and opens Excel for a preview. | ||
| file | Sends output to the file specified in Filename. | ||
| printer | Sends output to the printer specified in Printer. | ||
| 18 | Filename | The output file name. The file type must be {".xls"}, {".xlt"} or {".pdf"}. Important see note on Output File Names options. | |
| 19 | Printer | If Destination is printer then output is sent to the printer specified here. If this field is empty then output will be sent to the Windows default printer. Press <F3> to select from a list of available printers. NOTE: To clear the Printer field Press <F3> to select from the list of printers, and click on <Cancel> | |
Click the Continue button to pay the vendor(s).
If Confirm/edit Payments is set to yes, a table showing the payment that will be made to the vendor is displayed. You can edit the pay amount and/or discount for each of the invoices to be paid. If you make changes but then want to revert to the original payment as determined by Pay Account, click the <Undo Changes> button at the top.
The Title bar of the table shown below is for the vendor Advantage Office Supplies who's EFT status is empty or set to inactive. Both the Post Payment F5 and Post & Print Checks Ctrl+F5 actions are available.

The Title bar of the table shown below is for the vendor Arrakis Printing who's EFT status is set to active. Note the Post & Print Checks Ctrl+F5 buttons is unavailable, the text is red and the mouse pointer (a circle) is indicating that the action is unavailable.
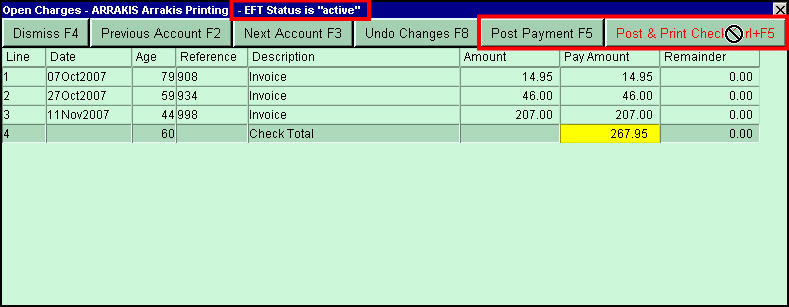
A separate table is displayed for each account, starting with the vendor that was active when the Pay Account command was issued or if a block was marked, the first vendor account in the block.
You can use the <Previous Account> or <Next Account> buttons to skip the payment for the vendor that is currently displayed, in which case any changes that you have made to the payment are discarded.
To post the payment for the current vendor, click the <Post Payment> button. To post the payment and print the corresponding check, click the <Post & Print Check> button.
To pay other vendors, use the <Previous Account> and <Next Account> buttons to move through the accounts on the vendor table.
When you are done paying vendors, click the <Dismiss> button to end the Pay Account command.