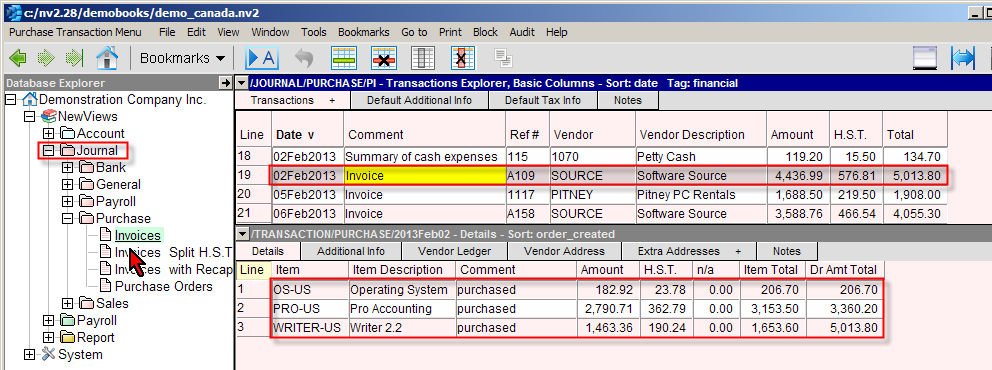
Navigate to the Purchase Invoice PI Journal by using the NV2 Database Explorer.
Activate the PI Journal and add a new item to the Journal by, pressing <Alt+E+A> or issue the command Edit>Append. NOTE: The line number is generated automatically.
Enter the date for the new purchase; press <F3> to pop up a calendar or type a valid date.
Enter a comment and the Vendor's invoice number for the header of the transaction.
Enter the Vendor's account in the Vendor column or press <F3> to pop up the account select box. The Vendor's description will be filled in automatically. Do not enter any amounts in the header, since they are generated automatically from the items on the distribution.
Press <F6> or activate the transaction detail table by clicking anywhere in the transaction detail window.
Add an item to the transaction detail table for each transaction item. Press <Alt+E+A>, or issue the command Edit>Append, or press <Enter> several times to wrap around to a new line. Fill in the debit account name or press <F3> to select, in the Item column. The Item's description should fill in automatically.
You may wish to fill in the Comment field with specific item details; this field is the Description field on the cross-account ledger.
Enter the amount of the line item from the Vendor's invoice. You can enter the net value or the gross amount in the Total column and NV2 will calculate the taxes. Taxes are calculated according to the trade tax settings. Any amount field can be over typed or used as a calculator.
Continue adding new items to the details (distribution) table until all items from the Vendor's invoice have been entered.
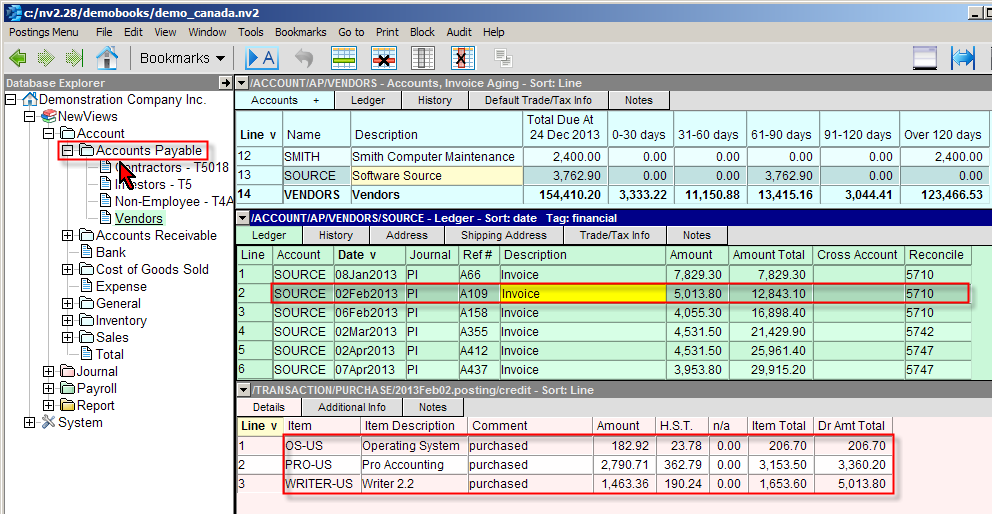
Navigate to an Accounts Payable Account by using the NV2 Database Explorer.
Activate the Vendor Account Ledger Explorer and add a new item to the Ledger by, pressing <Alt+E+A> or issue the command Edit>Append. NOTE: The line number is generated automatically.
Enter the Journal name in the Journal, PI for the new purchase; press <F3> to pop up a Journal list or just start typing the Journal name.
Enter the date for the new purchase; press <F3> to pop up a calendar or type a valid date.
Enter an invoice number and a description for the header of the transaction.
Press <F6> or activate the transaction detail table by clicking anywhere in the transaction detail window. Do not enter any amounts in the header, since they are generated automatically from the items on the distribution.
Add an item to the transaction detail table for each transaction item. Press <Alt+E+A>, issue the command Edit>Append, or press <Enter> several times to wrap around to a new line. Fill in the debit account name or press <F3> to select, in the Item column. The Item's description should fill in automatically.
You may wish to fill in the Comment field with specific item details; this field is the Description field on the cross-account ledger.
Enter the amount of the line item from the Vendor's invoice. You can enter the net value or the gross amount in the Total column and NV2 will calculate the taxes. Taxes are calculated according to the trade tax settings. Any amount field can be over typed or used as a calculator.
Continue adding new items to the details (distribution) table until all items from the Vendor's invoice have been entered.
This illustrates that transactions can be added to NV2 from the books of original entry (Journals) or from the books of final entry (Vendor), directly on the account ledgers.
You will find that after using NV2 for a while, that both methods of transaction are equally valid. The method of transaction entry will be determined by the types of documents you are entering.