Printing Purchase Orders
Purchase orders can be printed at any time using the Print>Invoices command. Purchase orders are printed
from the {Purchase Order} journal; you can print a particular purchase order or a group of purchase orders.
If no block is marked in the journal, the Print>Invoices command will print the purchase order that is
currently active. If a block of purchase orders is marked, the Print>Invoices command will print all the
purchase orders in the block.
NV2 provides you with a selection of pre-defined purchase order templates suitable for pre-printed forms or blank paper.
You can easily modify these templates or create your own. See Document Templates
for more information.
Direct email option for Purchase Orders
Purchase Orders may also be created as an email attachment and send directly from NewViews.
When NewViews prints directly to PDF, you are no longer required to send your document to the printer,
then to the scanner and then manually attaching the document to an email in a third party program
like Microsoft Outlook.
See email Print Settings for more.
Printing to paper
To print purchase orders:
-
Activate NewViews/Journal/Purchase/Purchase Orders in the NV2 Database Explorer.
-
Activate the purchase order to be printed. If you want to print more than one purchase order,
use the Block>Start and Block>End commands to mark the
purchase orders in a block.
-
Issue the Print>Invoices command and fill out the prompt as follows:
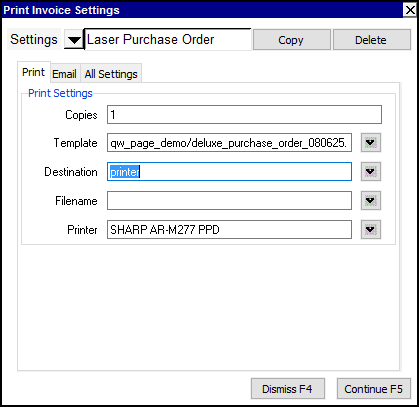
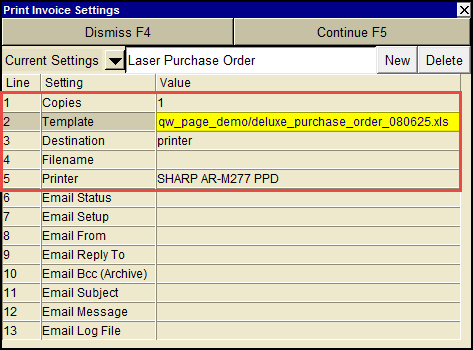
Print Invoice / Purchase Order Settings
|
Line
| Field
| Comments
|
1
| Copies
| The number of copies to be printed.
|
2
| Template
| The template to be used to print the purchase order(s). Press <F3> to select the template from an explorer (double click to select).
Purchase order templates supplied with NV2 contain the words "purchase_order" in their names. For example, "deluxe_purchase_order_080625.xls".
|
3
| Destination
| display
email
file
printer
| display - exports to Excel and opens Excel for a preview.
email - creates an email file for attachment.
file - sends output to the file specified in Filename.
printer - sends output to the printer identified by Printer.
|
4
| Filename
| The output file name. The file type must be {".xls"}, {".xlsx"}, {".xlt"} or {".pdf"}. Important see note on Output File Names options.
|
5
| Printer
| If Destination is printer then output is sent to the printer specified here. If this field is empty then output will be sent to the Windows default printer. Press <F3> to select from a list of available printers. NOTE: To clear the Printer field Press <F3> to select from the list of printers, and click on <Cancel>
|
-
Click the <Continue> button to print the purchase order(s).
Additional Information
NOTE: For specific information on templates and pre-defined cells, please
see Document Templates
and Predefined Cell Names for Templates.
ALSO NOTE:
By default, purchase order printing includes all detail items.
However, many users append accounting "housekeeping" items to the end of purchase orders,
but do not want the items printed on the orders given to a vendor.
Other users append narrative using the Description (i.e. Comment) column that they do want printed.
Direct user control can stop printing at any point.
Simply add a detail item with a Description (i.e. Comment) value of one of the following choices:
@printstop
@printend
--- housekeeping ---
--- details not printed ---
The stop directive row, and any rows following it are not printed.
Note that the stop directive values are case insensitive.
Copyright (c) 2003-2026 Q.W.Page Associates Inc., All Rights Reserved.