Caseware Export
This section describes how NewViews exports information to
Caseware Working Papers software, a client write-up software package
that is popular among accountants.
We will simply call it Caseware in this manual.
The short story is that you position on the trial balance report and issue
the Tools>Caseware Export command.
The trial balance information is exported to a text file in CSV format (comma separate values),
that will be subsequently imported into Caseware.
You can export summary amounts for each account, or in addition you can
include ledger items for the current fiscal year in the exported information.
Your accountants want this financial information for the fiscal
year that they intend to review, analyze, and adjust.
Exporting the information is quicker and less error-prone than
entering it manually.
After examining and analyzing your financial information, accountants
may make adjustments that need to be entered back into your accounting database.
We will not cover that operation here.
How to export to Caseware
-
Position on the trial balance report and switch to a Caseware information view.
You can be on any view of the trial balance that displays accounts (a blue table),
but we recommend the Caseware information view.
The accounts will be exported in the same order as encountered on the report.
The first time you export to Caseware you may not have a Caseware information view.
In that case, position on the trial balance and issue the View>Install>Caseware Setup
command.
This will add a Caseware information view which is a good place to prepare
to export to Caseware because it has a Caseware Account Type field -
see Caseware Account Types below.
Note that you need a trial balance report in order to export to Caseware.
If you don't have a trial balance you will need to add one.
Contact Q.W.Page customer support for assistance in this regard.
They have tools that will help create a trial balance automatically from
the financial reports.
-
Issue the Tools>Caseware Export command.
The following dialog box will appear:
-
Fill in the fields displayed in the export dialog box.
Caseware Export Prompt Fields
|
Field
| Description
|
Export Ledger Item Details
| Check this box to export ledger item details for each account (called journal entries by Caseware). The ledger items for the specified fiscal year are exported. If this box is not checked, then only account totals are exported.
|
Fiscal Year End
| This date is the last day of the fiscal year that is to be written up in Caseware. All accounting periods for the exported amounts are set relative to this date. Also, ledger items, if exported, are for the fiscal year ending on this date.
|
Export File
| Caseware expects the export file to have file type ".txt". You can use a file selection dialog box to pick a folder to which you can then append a file name. Or you can pick an existing file, in which case you will be asked for confirmation before overwriting.
|
-
Click the <Export> button.
The information is exported to the specified file.
You are prompted for confirmation if this will overwrite an existing file.
When the file has been created, you're ready to send the file to your accountant,
who can then import it into Caseware.
Note that the export file contains financial information in a basic text
format (csv - comma separated values) that can be viewed by anyone
with access to the file.
Because the information is no longer within a NewViews database file,
it is not subject to protection under the NewViews security system.
If your computer is accessible to "unauthorized" personnel,
then you should ensure that the export file is moved to a secure
computer and deleted from the insecure computer.
Another approach is to export the file directly to an external (removable)
hard drive or a writable CD.
Caseware Account Types
Caseware has the following account types:
1=Asset
2=Liability
3=Equity
4=Income
5=Cost of Sales
6=Expenses
8=Other Income
9=Other Expense
There is no number 7 account type.
Before you export the trial balance to Caseware, each account on the
trial balance must have one of the above Caseware account types.
So before exporting to Caseware follow the steps
below to prepare your trial balance:
-
Position on the trial balance report.
-
Issue the View>Install>Caseware Setup command.
This will create a new account view with the name Caseware Information.
In addition to useful information typically found on the account setup view,
this view will have a Caseware Account Type field.
You can use edit assist (<F3>) to fill it in as shown below.
-
Fill in the Caseware Account Type Column.
Since accounts of the same type tend to be grouped together
you should use the Tools>Fill Column command to
reduce the work.
Mark a block of accounts that will all have the same value, say
a group of expense accounts, set the Caseware account type of the
first one to "6=Expenses" in this case, and then
issue Tools>Fill Column to copy the value to
every field in the block.
The ability to use marked blocks to fill columns with like values
is one of the most convenient tools in the NewViews tool box.
-
Issue Tools>Caseware Export repeatedly until the column is filled.
Another fast way to fill in the Caseware Account Type field is to
position on the trial balance and repeatedly issue the Tools>Caseware Export
command.
The command will attempt to fill in the Caseware account type for
any account whose field is empty.
This is easily done for accounts whose NewViews types are known, such
as sales revenue, expense, inventory, payable and receivable accounts.
But NewViews cannot determine the Caseware type for general accounts
and total accounts.
Each time you issue the export command it will stop on the next account
it cannot fill in.
At that time you can fill in the account type for the account, and
perhaps for the following block using the fill column command.
Eventually the export command will run out of problem accounts
and will run to completion.
Keep in mind that setting up the trial balance by filling in the
Caseware account types only needs to be done once,
just before the first time you export to Caseware.
Normal Representation for Caseware Account Types
NewViews accounts have a Normal Rep field
whose values can be perpetual, periodic,
or opening.
The Caseware Export command checks that each Caseware account
type has a compatible normal representation according to the
values shown below:
NewViews doesn't check the normal representation against the Caseware
account type when the fields are filled in, but the Caseware export will
check to ensure compliance before anything is actually exported,
and will report any accounts that don't have valid values.
You Must have a Trial Balance
If you don't have a trial balance then you should create one.
You need a trial balance in order to export to Caseware.
Contact Q.W.Page customer support for assistance in this regard.
They have tools that will help create a trial balance automatically from
the financial reports.
Unique Names
Although NewViews allows duplicate account names (of different types), Caseware
cannot import a Trial Balance if it finds two accounts with the same name.
Importing Into Caseware
Operating Caseware is generally beyond the scope of what we want to cover here,
and we have to assume that the person importing into Caseware is familiar with
the Caseware software.
However, we will point the way in general toward importing
csv files that have been exported from the NewViews trial balance.
There are two cases to be covered, one where just summary information was
exported without the ledger item details, and the other where the ledger item details were
exported (the ledger detail check box in the Caseware export dialog box was checked).
To repeat, Caseware can import NewViews data using two different methods.
What determines which one you use is whether your data file contains ledger item
(transaction) details or simply the trial balance (in Caseware terminology - opening entries).
The two methods are outlined below.
Importing the Trial Balance (Opening entries):
-
Startup Caseware, select "Create a new file" and click OK.
-
Enter the new Caseware data file name, click on the "Blank File" icon, and click OK.
-
When the "Engagement properties" dialog box appears, click on ok. This will be filled in by data from the import file.
-
From the Caseware menu, issue the File>Import>Accounting software command.
-
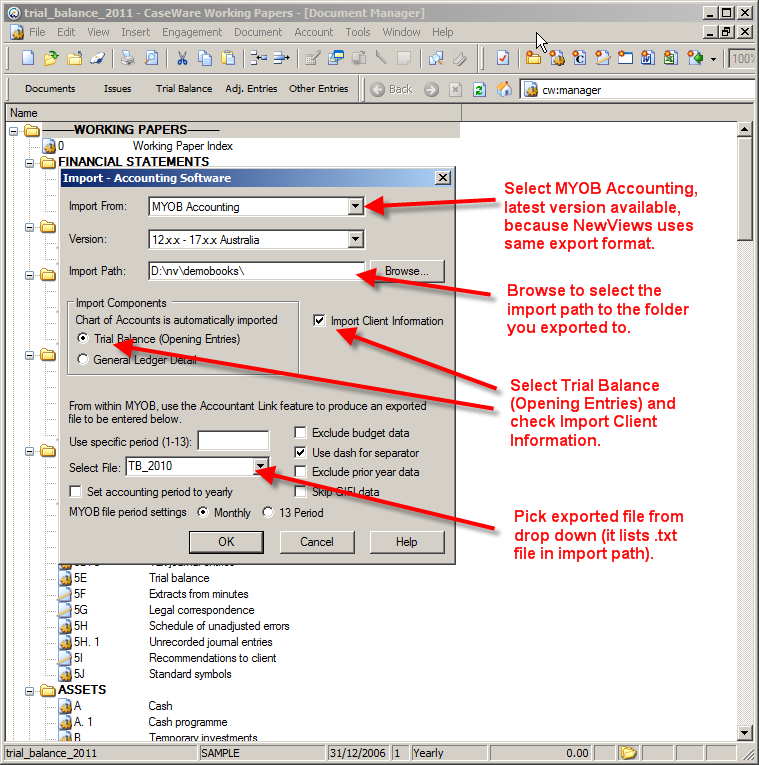
Fill in the Import - Accounting Software Dialog as shown below and click OK.

NewViews uses the same form as MYOB account so for Import from:, pick MYOB Accounting.
Use the latest available version.
For the import path click the browse button and select the
folder that contains the exported file.
Select Trial Balance, check Import Client Information, and
pick the exported file from the Select File: drop-down.
Click Monthly.
When you click OK, the import will be processed.
-
You can now view the imported information using Caseware.
For example, double-click on report 5E Trial Balance to view the trial balance.
Set date ranges and options to view the fiscal year that was exported.
When importing subsequent fiscal years you do not need to create a new
Caseware file.
Instead, open the existing Caseware file and issue the
File>Import>Accounting software command to import the newly
exported file into the existing Caseware file.
Importing General Ledger transactions:
-
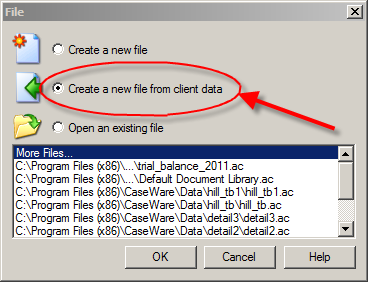
Start up Caseware, select Create a new file from client data, and click OK.
-
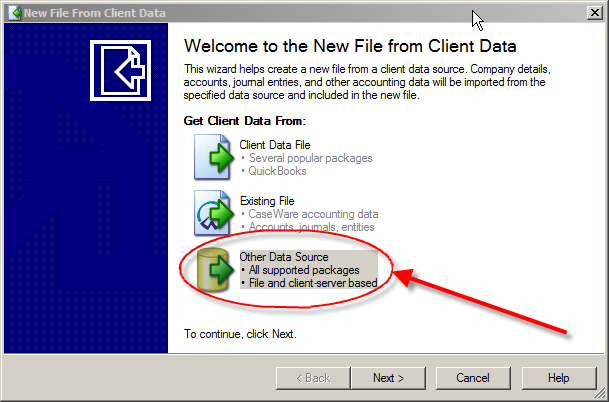
Select Other Data Source and click Next.
-
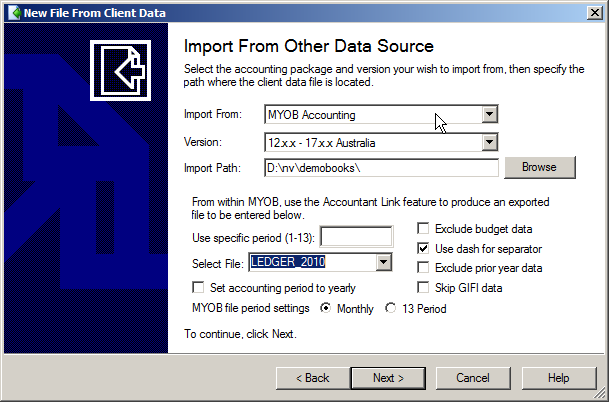
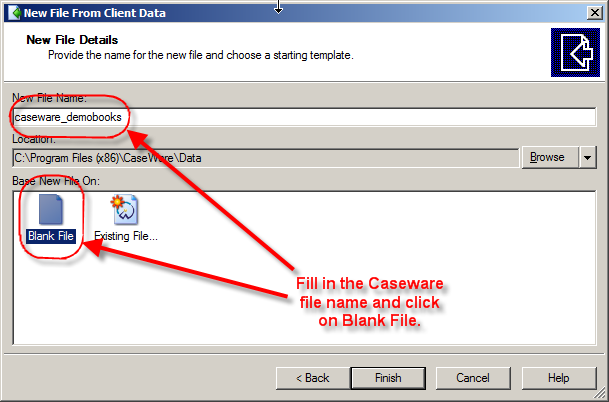
Fill in the New File from Client Data dialog as shown below:

-
Set Import From to MYOB Accounting and select the latest version available.
Set the Import Path to the folder containing the exported file.
Select Trial Balance (opening entries). Tick the box "Import Client Information".
Pick the Select file from the drop-down that will
list .txt file from the import path selected above.
Select Monthly as the MYOB file period setting.
-
Click Next. The dialog below appears.

-
Enter new Caseware file name, click on the Blank File icon and click Finish.
The file is imported into Caseware.
Copyright (c) 2003-2026 Q.W.Page Associates Inc., All Rights Reserved.