All sales and customer accounts have a price table with up to five quantity/price break points on each row. You can set price breaks for any sales account (i.e. product), and also override these price breaks for any or all customers using customer price tables.
When price tables aren't used, the price of a sales invoice item is taken from the Price field of the sales account.
The most common way to use price tables is to add them only to sales accounts. This lets you add up to five breaks on a product-by-product basis.
You add a single row to the price table for any sales account and fill in the quantity/price breaks. Each row also allows you to select a customer account but you don't select one when you want the row to apply to all sales for the sales account. That is, customers are selected only when overriding with customer price tables as described below.
Sales account price tables should satisfy the needs of most companies, but additional control is available using customer account price tables. For each row you add to a customer account price table, you select a sales account. When a product is sold to the customer, if the customer has a price table row for that product, it is used. This means that although you may have specified price tables for any or all sales accounts, you can override those prices on a customer-by-customer and product-by-product basis. It is hard to imagine any situation where this degree of control is insufficient.
Rows on a customer price table also appear on the corresponding sales account price tables. Customer price tables are sorted by sales account name and description. Corresponding sales account price tables are sorted by customer account name and description.
Before you set up price tables it certainly helps to know how prices are actually looked up. Price tables are used for both sales invoice and sales order line items. But for simplicity we will just use the term invoice in this discussion. When a quantity is entered on an invoice item, the price is looked up and the amount is extended. The price is looked up as follows:
The customer is checked first.
The customer price table is checked against the particular sales account selected on the line item. If the customer price table has a row for that sales account then it is used to set the price according to its quantity/price breaks. Otherwise proceed to the next point.
Note that checking the customer first is the action that allows sales account prices to be overridden on a customer-by-customer basis.
Failing the above, the sales account is checked.
The sales account price table is checked for a row that has no customer account specified. If it is found, then it is used to set the price according to its break points. Otherwise proceed to the next point.
Failing the above, the sales account price field is used.
Each sales account has a price field that is used when the customer and sales price tables do not apply.
This implies that the sales account price field is used when price tables have not been filled in, which is exactly the original behavior of prices before price tables were introduced.
Each customer account has a Sales Price Percent field on the Trade Information view. The price is looked up as described above and then it is always adjusted by the percent found in the customer's sales price percent. Note that the customer sales price percent is defaulted to 100 percent.
Although the price is automatically determined as described above, it can be overridden by the data entry operator. If the quantity or sales account are then changed on the invoice item, the price will be looked up again, and the operator will have to override it again. Note that like all accounting information, the price actually used is recorded in the audit trail.
Each row in a price table has up to five quantity/price breaks. The row is used basically as you would expect. For example, if quantity 15 is entered on an invoice, then the price is taken from the first break point whose quantity is greater than or equal to 15. For those who need more information we provide additional rules below:
Quantities (but not prices) must increase left-to-right.
As you would expect, you must enter quantities that strictly increase from left to right. If you enter a quantity that has higher quantities to its left, an error will be displayed when you attempt to move off the row or when you press <F5> to commit it.
There are no corresponding restrictions on prices. Although prices normally tend to decrease for higher quantities, this is not enforced by NewViews.
You must enter a price if you enter a quantity (and vice versa).
For any of the five break points, you must enter both the quantity and price, or neither. But you can't enter just one without the other.
If you entered either the quantity or price but not both for any break point, an error will be displayed when you attempt to move off the row or when you press <F5> to commit it.
If both quantity and price are unspecified, the break point is ignored.
You do not have to fill in every column from left to right. If the quantity and price for a break point are not specified, then the break point is simply skipped. To some degree, this allows you to layout tables the way you want.
Quantities and prices are not rounded.
You can enter quantities and prices with more than two digits to the right of the decimal point. By default, prices are displayed to two decimal places but this is purely a formatting issue. To change the format, issue the Window>Define Columns command, position on any field in the define columns left pane, and change its Format in the right pane. When on the Format field, press <F3> to select from the available formats.
The first break point would be set to quantity one.
This is not actually enforces by NewViews, but if in doubt, set the first quantity to one.
However, suppose the quantity of the first break point is 10. If the invoice item quantity is less than 10, then the sales account Price field is used. Note this effectively gives you six break points.
Using a first quantity other than one should only be done, if at all, on the price table for a sales account, and only on the row that does not specify a customer. The first quantity should be one for all customer price table rows. The main purpose of adding customer price tables is to override the sales price table and if you specify a non-unity first quantity break, such as 10, the sales price table will not be overridden for quantities less than 10 for the sale of the product to the customer.
Like all accounting information, prices are audited. Every change made to a sales or customer price table is recorded in the audit trail along with all information about the change, who made it and when, from which computer, etc.
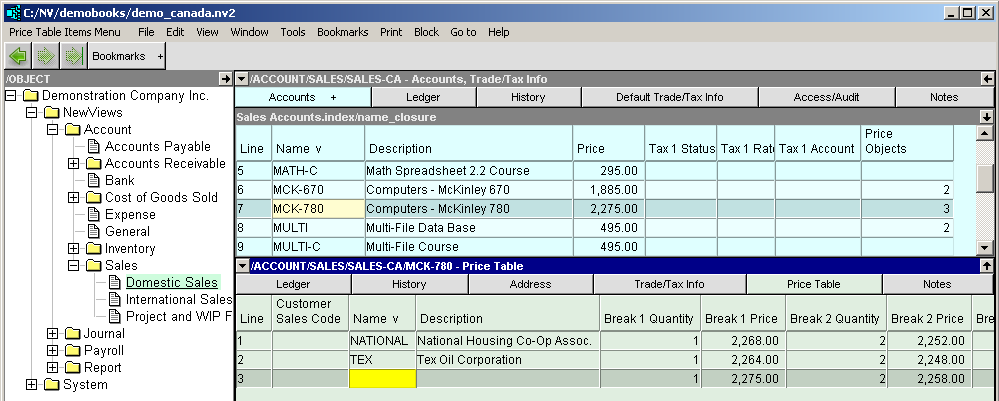
Position on an account explorer that contains sales accounts.
For example, you can click on the sales account in the NV2 Database Explorer. Or you can click on any report containing sales accounts. See the figure below.
Use the window list button to switch the lower pane to the Price Table view.
The top pane should be a blue table containing sales accounts. The bottom pane should be positioned on the Price Table view.
Insert a row in the price table in the bottom pane.
Issue Edit Insert or Edit Append, or press the <Ins> key.
Fill in the quantities and prices for up to five price breaks.
Note that you do not enter the name or description field. These are used to select customer accounts when using customer account price tables. By leaving these field unspecified, the table row applies to all sales for the account.
Repeat the steps above for other sales accounts as required.
You can change the sales account by moving to a different row in the top pane. The price table in the bottom pane will automatically switch to the table for the new sales account.
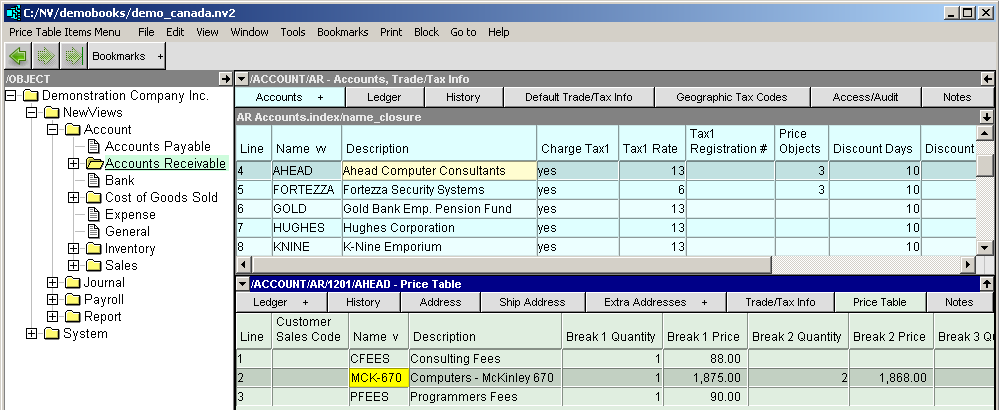
Note that customer accounts are also often called accounts receivable accounts. The terms are basically synonymous.
Position on an account explorer that contains customer accounts.
For example, you can click on the accounts receivable account in the NV2 Database Explorer. Or you can click on any report containing customer accounts. See the figure below.
Use the window list button to switch the lower pane to the Price Table view.
The top pane should be a blue table containing customer accounts. The bottom pane should be positioned on the Price Table view.
Insert a row in the price table in the bottom pane.
Issue Edit Insert or Edit Append, or press the <Ins> key.
Position on the name or description and pick a sales account.
Position on either the Name or Description field and press <F3>. A select window will pop up with the sales accounts. Position on the desired sales account and press <Enter> or double-click.
Note this step is missing when adding price tables to sales accounts. You could in fact add price table rows to sales accounts, picking customers as you go, and the table rows automatically appear on the corresponding customer price tables. However, from a practical point of view, we think it is preferable to work on the customer price tables when overriding the prices used for sales accounts. A common scenario is to set prices for all sales accounts, and then override a few for selected customers and/or for individuals products as required.
Fill in the quantities and prices for up to five price breaks.
Repeat the steps above for other customer accounts as required.
You can change the customer account by moving to a different row in the top pane. The price table in the bottom pane will automatically switch to the table for the new customer account.