|
|
|
|
|
|
|
Latest Release of NewViews
For optimal performance, make sure you are running the most current version:
NV 2.32.4 (June 25, 2018)
For details, click here.
|
|
Has Your Contact Info Changed?
Make sure important info about your NewViews software and services gets to your email inbox by
keeping your contact info up to date. Let us know about any changes by sending email to
info@qwpage.com
or calling Customer Service at 1-800-267-7243.
Don't forget to add the email address updates@qwpage.com to your safe sender list!
|
|
Follow Us on Social Media
Follow NewViews on Facebook and subscribe to our channel on YouTube to get the latest news and videos:


|
|
|
|
|
|
|
|
|
Don't want to receive these emails anymore? Unsubscribe.
|
|
|
Summer 2018
|
|
NewViews Feature Showcase - Print Journal Transactions

In this month’s feature showcase, we take a look at how to print journal transactions in NewViews, a powerful
new tool that was added in version 2.32.
To watch a short video that demonstrates this feature, click here.
|
|
Summer Promo - Update Any Outdated Version of NV2 for $215

There's still time to take advantage of our summer promo! Upgrade any older version of NV2 to the current version for only $215.
Take advantage of new features like printing journal transactions, pinning default views, adding attachments throughout your books and more.
Orders can be placed online, or by calling 1-800-267-7243.
|
|
Resolving Conflicts with TeamViewer
The Q.W. Page Tech Support team provides remote support for NV2 and NewViews for Non-Profit Housing using TeamViewer version 12 (released 2017).
This version is bundled with all NewViews installations.
If your organization uses a newer version of TeamViewer (e.g. version 13, released 2018), you will experience a conflict when trying to
connect to one of our support reps. This conflict can easily be resolved for the duration of the support session by following a few
simple steps. For complete instructions, click here.
|
|
Custom Analysis in NewViews
Custom Analysis is a versatile tool for analyzing reports. Multiple Period Analysis (another versatile tool) allows you to quickly and easily
create a comparative analysis of amounts over a date range with custom resolution, but all columns share the same index, amount type, tag and representation.
With Custom Analysis, you can set the date range, index, amount type, tag and representation for each individual column to meet
your unique analysis needs.
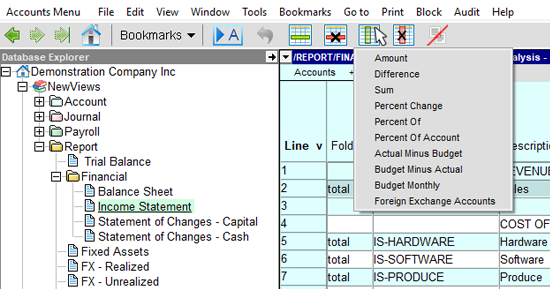
Several column types, in any combination, can be added to a Custom Analysis. For the purposes of this article, we will focus on the first
6 types: amount, difference, sum, percent change, percent of, and percent of account.
Amount columns are the most commonly used. Calculated columns (difference, sum, percent change, percent of) can be added
once the two amount columns used for the calculation have been added.

| amount |
Displays amounts for a given date range, index, amount type, tag and representation. This type of column
is the most commonly used. |
| difference |
Displays the difference between the two preceding amount columns (i.e. displays the results
of subtracting amounts in the 1st column from the 2nd column). |
| sum |
Displays the sum of the two preceding amount columns. |
| percent change |
Displays the percentage change between the two preceding amount columns (i.e. displays
the % change of the 2nd column with respect to the 1st). |
| percent of |
Displays an amount column as a percentage of the column that follows it (i.e. displays amounts
in the 1st column as a percentage of the 2nd column). |
| percent of account |
Displays amounts in a given date range as percentages of a specified account. |
| actual minus budget |
Adds 3 budget columns - financial amounts, budget amounts and actual minus budget amounts.
See Budgeting in the User Manual for details. |
| budget minus actual |
Adds 3 budget columns - financial amounts, budget amounts and budget minus actual amounts.
See Bugeting in the User Manual for details. |
| budget monthly |
Adds a column that can be used to enter budget amounts.
See Budgeting in the User Manual for details. |
| foreign exchange accounts |
See Foreign Currency Translation in the User Manual for details. |
As new columns are added to the Custom Analysis view, they are appended to the end; they can be moved later.
Important! When adding a calculated column (difference, sum, percent chage, percent of), the cursor
MUST be positioned in the second of the two columns to be used in the calculation to get the desired results.
Once added, columns are defined individually by double-clicking the column header, or as a group
using the Window > Define Columns command (Ctrl+F11).
You can create any number of Custom Analysis views by saving each group of settings with a unique name.
For step by step instructions on adding and defining columns on the Custom Analysis view, along with examples,
click here.
|

Changing the “Total Due At” date on Invoice and Order Aging Views
The “Total Due At” date used for Invoice Aging and Order Aging views
is set using User Options (under System in the Database Explorer).
Administrators and users with authorized access can change this date by navigating to User Options and
entering the desired date in the “Report As Of Date” field.
NewViews Function Keys
Looking for a chart that tells you what each function key does in NewViews? Choose Help > Keyboard from
the menu bar to access a comprehensive chart of function key designations and other keyboard shortcuts.
Converging on Items
Converging on items enables you go to straight to specific items on tables with many rows by just typing a few
characters (e.g. the first few characters of the name or description).
Clicking a column title will sort the items by that column (if the column can be used for sorting).
With certain columns, you also have the option of clicking the title while pressing the Ctrl
key. If Ctrl+click is allowed, the sort order changes as usual, and the column is highlighted.
When a column is highlighted, you can converge quickly on a specific item.
Example: Converging on an account by name
Ctrl+click the title of the Name column to highlight it; all items are ordered by
name (if they weren’t already) and the column is highlighted. Start typing the name of the account you’re looking for.
As you type, you will converge on account names matching the sequence of characters. Let’s say you’re looking for the
account name SMITH - if you type the letter s and you go directly to the first account name starting with s.
If you continue to type the letters m and then i, that will likely be enough to quickly converge on the SMITH account.
Typically, you only have to two 2-4 characters to find the items you are looking for.
Pressing Backspace will reverse the proccess keystroke by keystroke if you type the wrong
character by mistake. Or, you can press Home or just move the
cursor to another row to start the process over.
When you reach the desired account, be sure to Ctrl+click the column title again to turn off the highlighting.
Note: This technique can be used to quickly move to a posting with a specific date. When converging on a date,
it must be entered in the format YYYYMMDD format.
|
|


