|
|
|
|
|
|
|
Current Release of NewViews
For optimal performance, make sure you are running the most current version:
NV 2.36 (Aug 19, 2022)
For details, click here.
|
|
Has Your Contact Info Changed?
Let us know about any changes to your contact info by sending email to
info@qwpage.com
or calling Customer Service at 1-800-267-7243.
Don't forget to add the following email addresses to your safe sender list:
updates@qwpage.com
office@qwpage.com
|
|
|
|
|
|
|
|
|
Don't want to receive these emails anymore? Unsubscribe.
|
|
|
Fall 2022
|
|
Data Recovery Service

Although it doesn’t happen very often, there are circumstances that can cause corruption in a NewViews set of books (e.g. computer
hardware failure, viruses, etc.). For that reason, we offer a Data Recovery Service and although there is no guarantee
that your data can be fully recovered, our experts have an excellent track record in this regard.
For the best chance of data recovery if it ever becomes necessary, you should always ensure you are running the most
current version of NewViews. Running older versions of NewViews not only increases your exposure to external security threats
that are constantly evolving (security enhancements are included in almost every release of NewViews),
it also hampers our ability to successfully recover your data. Furthermore, data recovery
is less expensive for users on the current version, as shown below.
NewViews users who are running the most current version of NewViews:
-
$490 for the 1st two hours of technician time.
-
$195 for each additional hour of technician time.
NewViews users who are NOT running the most current version of NewViews:
-
$690 for the 1st two hours of technician time.
-
$295 for each additional hour of technician time.
To check which version of NewViews you are running, use the command Help > About to display system information
in your browser. You will find your version number in the NewViews Program section. Note that you will also see
your company number and NewViews serial number in NewViews Registration section.
As a general rule, you should check the integrity of your NewViews database(s) prior to making your regularly scheduled backups
(monthly, at a minimum) so you can be confident your backups are reliable. This can be done by running the
NewViews Database Utilities program from the Windows Start menu, selecting your database file and
choosing the Check option. On average, it takes about two hours to check a database that is 100 MB.
For more information on checking data integrity, see
Database Utilities in the
NewViews NPH User Guide. For more information on backing up, see
Backing Up in the NewViews
NPH User Guide.
|
|
Attachments and the Size of Your Books

Attachment Views in NewViews are used to store and manage attachments, which can be PDFs, Microsoft Office documents, photos,
scanned images, etc. Image files (jpg, png, gif and tif) which are less than 8 Mb are displayed directly in the detail pane. For other types
of attachment files, you are prompted to double-click to launch the file’s default viewer or application.
Typical attachments in a NewViews NPH set of books could include:
-
The organization’s legal documents (e.g. articles of incorporation, agreements, mortgages, insurance policies, etc.)
-
Contracts (e.g. lease, tenancy and rental agreements)
-
Documents related to income verification for RGI calculations (e.g. NOAs)
-
Floor plans for rental units
-
Documents supporting individual transactions (e.g. purchase invoices)
The ability to save attachments is a very useful feature that many users have come to rely upon. However, they do increase the size of your books
and it makes sense to ensure that any attachments you save have been optimized in terms of file size. This is especially true when it comes to
image files, which can sometimes be quite large. For example, if you are regularly taking high resolution pictures with a smart phone and uploading them
directly to NewViews, each individual photo could be anywhere between 1 MB and 14 MB, which would significantly increase the size of your books
over time. To keep the size of your books manageable, it would be better to adjust the settings on your phone to ensure that the images you take (to use as
attachments in NewViews) are 1 MB or less in size. You can also choose to reduce the size of images taken with a smartphone before uploading them
to NewViews using a program like Microsoft Photos (included with Windows 10).
If you routinely save large PDF files as attachments in NewViews, these can also be reduced in size before uploading them using PDF compression
tools. Adobe Acrobat DC and Pro both give you the ability to compress PDFs, as do some other programs.
Note: The resize option for attachments in NewViews is for display purposes only, it does not actually resize the attachment.
|
|
Reminder - Price Changes as of Sept 1, 2022
Please note that effective September 1, 2022, the following price changes took effect:
| Product/Service |
Old Price |
New Price (Sept 1, 2022) |
| NewViews NPH Additional Workstation |
$745 |
$795 |
| NewViews NPH Support Plan |
$225 |
$250 |
| NewViews NPH Support Pay-per-call |
$2 /min ($20 minimum) |
$2.50 /min ($25 minimum) |
| NewViews NPH Online Training |
$115 /hr |
$135 /hr |
| NewViews NPH On-site Training |
$135 /hr |
$175 /hr |
Prices for annual Update Plans, Data Hosting and Read-only Workstations have not changed.
|

How do I start tracking pets, parking and/or emergency contacts for members/tenants?
Did you know that NewViews NPH lets you track custom data like pets, parking and emergency contacts for members/tenants?
If you’re not currently using this useful feature, you can enable it at any time following the steps below:
-
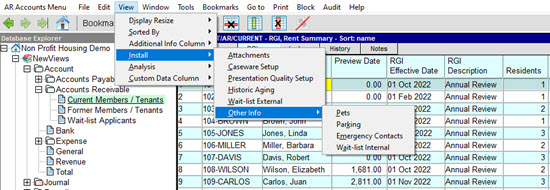
In the Database Explorer, navigate to Current Members/Tenants and position anywhere in the blue table.
-
Issue the command View > Install > Other Info and choose the data you would like to track,
i.e. Pets, Parking or Emergency Contacts.
Note that if you would like to install all three categories, you will have to issue the command three times, choosing
a different category each time.
Once the Other Info view has been installed, the Current Members/Tenants table will have a tab called
Other Info. This tab has one view which displays the name and description of the member/tenant account, as well as one or
more columns for pets, parking and/or emergency contacts (depending on which type of data was chosen). These columns show the number
of items in each category associated with the member/tenant account.
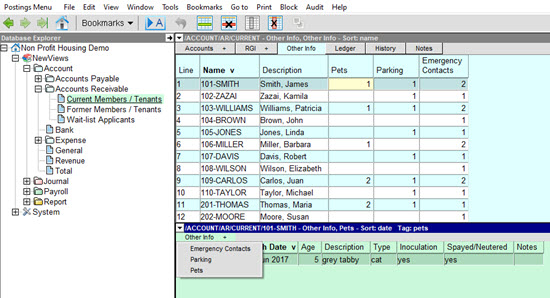
The detail pane (green table) in the Other Info view is used to enter and/or view detailed information for pets,
parking and/or emergency contacts. To view these details, either position on the appropriate column in the blue table (top pane)
or click the Other Info+ tab (bottom pane) and select the desired view.
For more information on the Other Info view and how to use it, see
Pets/Parking/Emergency
Contacts in the NewViews NPH User Guide.
Missing templates for personalized forms/notices
NewViews for Non-Profit Housing uses the mail merge feature to generate personalized forms and notices for members/tenants.
Mail merge enables you to substitute portions of a Word document with information from member/tenant accounts, including RGI
related details.
The process of doing a mail merge to generate RGI related forms/notices is as follows:
-
Switch to a view that displays the information you want to use in the mail merge.
-
Position on a member/tenant account (Mail Merge > Item) or mark a group of accounts in a block (Mail Merge > Block).
You can also choose to mail merge all the accounts in the table (Mail Merge > All).
-
Issue the appropriate Tools > Mail Merge command and fill in the prompt box. To choose the specific form/notice you
want to generate, click the arrow to the right of Settings at the top of the prompt box.
But what if the form/notice you want is missing from the drop-down list?
This usually means that you are not on a view that contains the information that form/notice requires. For example,
let’s say you want to generate a notice of rent change for a tenant, but it does not show up as one of the
setting options (see below).
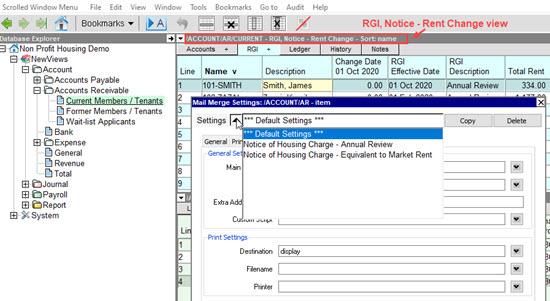
Although we are on the RGI Notice - Rent Change view in the example shown below, this view does not actually display the
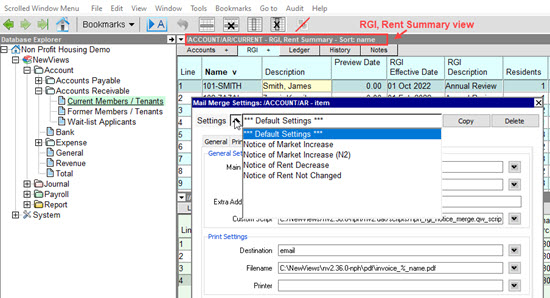
information that is required for a notice of rent change. Instead, that information is available on the RGI - Rent Summary view.
Once you switch to that view and issue the Tools > Mail Merge command to display the prompt box, you will see the notices you
are looking for.
-
Once you have filled in the prompt box, click Continue or press F5 to generate the form/notice.
More information can be found in the NewViews NPH User Guide in the section
Personalized Forms and Notices.
You can also watch a short video that demonstrates the process on our YouTube channel clicking here.
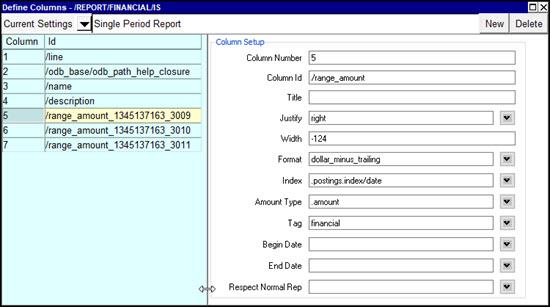
Window > Define Columns (Ctrl+F11) only shows title bar
You can control the information displayed in one or more columns by pressing Ctrl+F11 or issuing
the Window > Define Columns command. For a detailed description of the types of columns
and the formatting options available for each, see
Setting Up Columns
in the NewViews NPH User Guide.
So what should you do if you issue the command and all you see is a title bar, as shown below?

All this means is that you (or someone who shares your workstation) has inadvertently shrunk the
Define Columns prompt box. To fix this, use the mouse to hover over the lower edge of the title bar.
When the pointer changes to a double arrow, click and hold the left mouse button while dragging the mouse to
expand the prompt box until all the settings are visible.

This technique can be applied to any prompt box that has been shrunk inadvertently, preventing you from seeing
all the settings.
Note: Did you know that you can use Window Define Columns to set custom titles for amount columns?
For instructions, see the article Customizing Amount Column Titles in the
February/March 2021 issue of the QW Journal.
|
|